You can access the full course here: EasyAR and Marker-Based Apps for Beginners
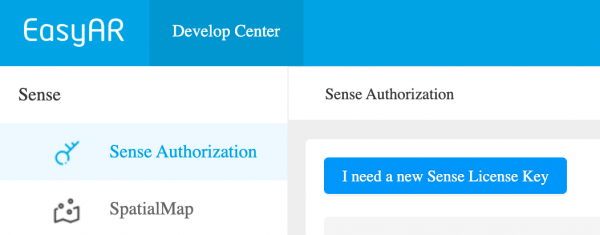
To begin our excursion into AR, you need to download the EasyAR SDK. Go to https://easyar.com/ and sign up for a new account if you don’t already have one. Once signed up/signed in you should be taken to the Developer Center page. If not, select it. Be sure you now also have Sense Authorization selected on the left. Then click I need a new Sense License key.

From the options that now open up, select the EasyAR Sense 4.0 Personal plan. Depending on the device you are publishing to create either a bundle ID or package name. This can be anything you want, but typically is in the format: com.[companyname].[appname].
Even though we won’t be using it, we need a SpatialMap database ID. Enter in anything you like then skip down and press Confirm.
You will be taken to a page that shows your new project on a list. Click your project and you will see a page that shows you your loooooooong license key. Copy the entire key to your clipboard.
Return to the EasyAR homepage by clicking the EasyAR logo on the upper-left of the page and then select Download from the top menu. This will take you to the downloads page. Select the Unity plug-in tab and to download it.
Once downloaded, unzip the package, create a new Unity project and drag the plug-in package into the project Assets folder. Accept all the default files to import.
When the package is installed an EasyAR menu choice will appear across the top. Choose that and select Change License Key.
Now go ahead and paste your license key into the field in the Inspector.
Transcript
Hey everyone. In this lesson we are going to be going over setting up our EasyAR SDK inside of Unity, and also setting up our SDK on the EasyAR website which is needed in order to set up our app.
So first of all, I’m gonna go here to the EasyAR.com website this is where we can set up our developer account, and also download the SDK for Unity. And yep, so EasyAR is an augmented reality SDK, and recently it has had quite a few new features added to the SDK, to EasyAR, which is making it a fairly competitive product compared to others such as ARKit and ARCore.
So on the EasyAR website, let’s begin by signing in or signing up if you don’t have an account, so if you click sign up, you’ll go to this page here where you just need to enter in some information such as username, email, and your password. I’ve already got an account, so I’m just gonna sign in over here. And when you sign in, you’ll see that you get taken to the EasyAR portal here.
And what we need to do here is create something called a license key. And a license key will allow us to use the SDK inside of our Unity project, so let’s create one right now. Over here, make sure you are on the sense authorization page right here, and click on “I need a new Sense license key.” You can create, I believe as many as you want, so if you want multiple AR projects, you can do that. Although EasyAR does have various different plans and packages that you can purchase, but we’re just gonna stick with the personal package for now because that really has all the features that we need. If you do wanna go more in-depth with the spatial mapping and using their cloud services, then you might wanna look into some of the paid packages.
So I’m just gonna click on “I need a new Sense license key” right here. And first off, we need to choose the type, we’re gonna stick to EasyAR Sense 4.0, the most recent one. And let’s select the EasyAR Sense 4.0 Personal Edition. You can click professional if you want, but that is one of the paid options. And right here it’s asking us to authorize the functions, so these are just all the things that we’ll have access to, which is fine, we are only gonna be focusing on image tracking, so Planar Image Tracking, because that is one of their strengths.
Now down here, we need to enter in some application details, first of all, the app name. It really doesn’t matter what you call the app, so we can really call that whatever we want. So I’m just gonna enter in here our EasyAR image tracking. And then you’ll see that we have the supported platforms, iOS, Android, Windows. If you are publishing to a mobile device then you’re covered right here.
And now we need to enter in the bundle ID and the package name. Now what these are, these are the unique identifiers that your app will have, if you’re on an Android device, it’s called a package name, and on iOS it’s called a bundle ID. And this is needed for each and every app that you have on your phone, so that the operating system knows what it is, and so that it doesn’t really try to conflict with other apps with the same name.
So I’m gonna be filling the one out for Android, since that is the device I’m gonna be publishing to. The general layout for setting up a package name or bundle ID is by first going com, for company, dot your company name, so I’m just gonna put in here Zenva, although you can put in your name, or whatever company name you want. And then we’re gonna go dot, and then the product name.
So our product name, we’re just gonna have, EasyAR image tracking app, you can really call this whatever you want. We just need to make sure that we do have the exact same package name or bundle ID for when we hop over inside of Unity as we need to make sure that these two match up so that EasyAR knows that this is the, this is the SDK key we are trying to connect to.
Now that we have that, we can choose our spatial mapping region. Since we’re not really gonna be looking at the spatial mapping features, we don’t really need to choose this, we can skip over some of this stuff here, and we should just be able to click confirm right now, so we’ll click on that. We do need to enter in a database name though, for the spatial map database, even though we’re not gonna be using it, so let’s just put in our EasyAR Image Tracking.
Click confirm, and this will take us then to the previous page, but now we have a new field here called EasyAR Image Tracking. We have our SDK key, our license key. We can click on that. And it will take us to this page right here, and as you can see there is this very large license key, we’ll need to copy this as we do need this over in Unity when we want to set up the app, so it knows which license key it wants to connect to. So we’re gonna copy that.
And now what we can do is download the actual SDK for Unity. So for this, we wanna go back to the EasyAR website, just click in the top left on the EasyAR icon, go over to download. And we just wanna click on the EasyAR Sense Unity plugin here at the top. This will take us down to the Unity plugin page, and let’s just download the Unity ZIP right here. It is around 60 megabytes, so it may take some time to download, but in the meantime let’s open up a brand new Unity project, I’ve got one right here.
And when that is finished downloading, it is gonna have a Unity package file, which we can just drag and drop into the project, and that will install the entire SDK automatically.
Okay, now that it’s finished downloading, we can open up the ZIP folder right here and inside of this ZIP, you’ll see that we have a number of things. We first of all have the Unity package, which is mostly all of the size, and then we just have a readme for, I believe this is the Chinese readme right here, and we have a English readme.
So I’m gonna extract this to somewhere on my computer, and then over back inside of Unity. I’m gonna drag and drop this file into our project window down here, and it’s gonna start decompressing the package, and it’s quite a large package, but when it is done, it’ll pop up with this window right here. And let’s just click on import. And this here is gonna import the SDK, it’s gonna import all the scripts, all the plugins, all of the things we need to run EasyAR, so that’s gonna be doing that right there. And make sure you do have your EasyAR SDK key copied to your clipboard as we’re gonna be pasting in right now.
So what we want to do here is go up to EasyAR on the top here, it’s now appeared, we can click EasyAR. And then we can click on change license key right here. Click on that. And then, over here in the EasyAR SDK license key field, we can just paste in our license key like so, quite a big number. And that’s pretty much it, we are now connected to our EasyAR SDK over on the EasyAR website, so it knows that we are authorized, and we are now able to use the app.
In the next lesson, we’re gonna begin to actually set up our Unity project, we’re gonna be changing some of the project settings, and setting up our folders down here, for when we begin to actually create our image targets. So I’ll see you all then in the next lesson.
Interested in continuing? Check out the full EasyAR and Marker-Based Apps for Beginners course, which is part of our Augmented Reality Mini-Degree.


