Table of contents
Intro
Check out the previous parts for our How to Create an AR Shoot’em Up Gallery Game here:
In my last tutorial Create an AR Business Card, I showed you how to wow the crowd at networking events with your very own augmented reality business card. After all that work, let’s blow off some steam at the shooting gallery by creating an augmented reality carnival-style game for iOS!
The complete Unity project for this tutorial is available here. All images and models used in this tutorial have been created by me.
This tutorial was implemented in:
Xcode 10.1
Unity 2018.3.8f1
Tutorial Outline
- Setup Unity Project
- Install AR Foundation & ARKit Package
- AR Game Configuration
- Import 3D Bottle Model
- Design 3D Bottle Model Materials
- Assign Material to 3D Bottle Model
- 3D Model Physics
- Create a Plane Object
*Building to Android with ARCore is outside the scope of this tutorial, we encourage you to research how to do so if you would like to.
Did you come across any errors in this tutorial? Please let us know by completing this form and we’ll look into it!

FINAL DAYS: Unlock coding courses in Unity, Godot, Unreal, Python and more.
Setup Unity Project
In my last tutorial, I had you download the ARKit 2.0 Plugin from Bitbuckets because said plugin was deprecated from the Asset Store. This means that new purchases of the package are not allowed and that only users who already purchased or downloaded the package before it was deprecated, are allowed to download it. But do not fear, Unity has developed the AR Foundation package in order for it to be used to develop a more efficient AR ecosystem.
You’ll be using said foundation to build your game.
To get started, open Unity and click New to create a new project. Let’s title it AR Shooting Gallery. Select where you would like to save your project and in the Template dropdown select 3D.
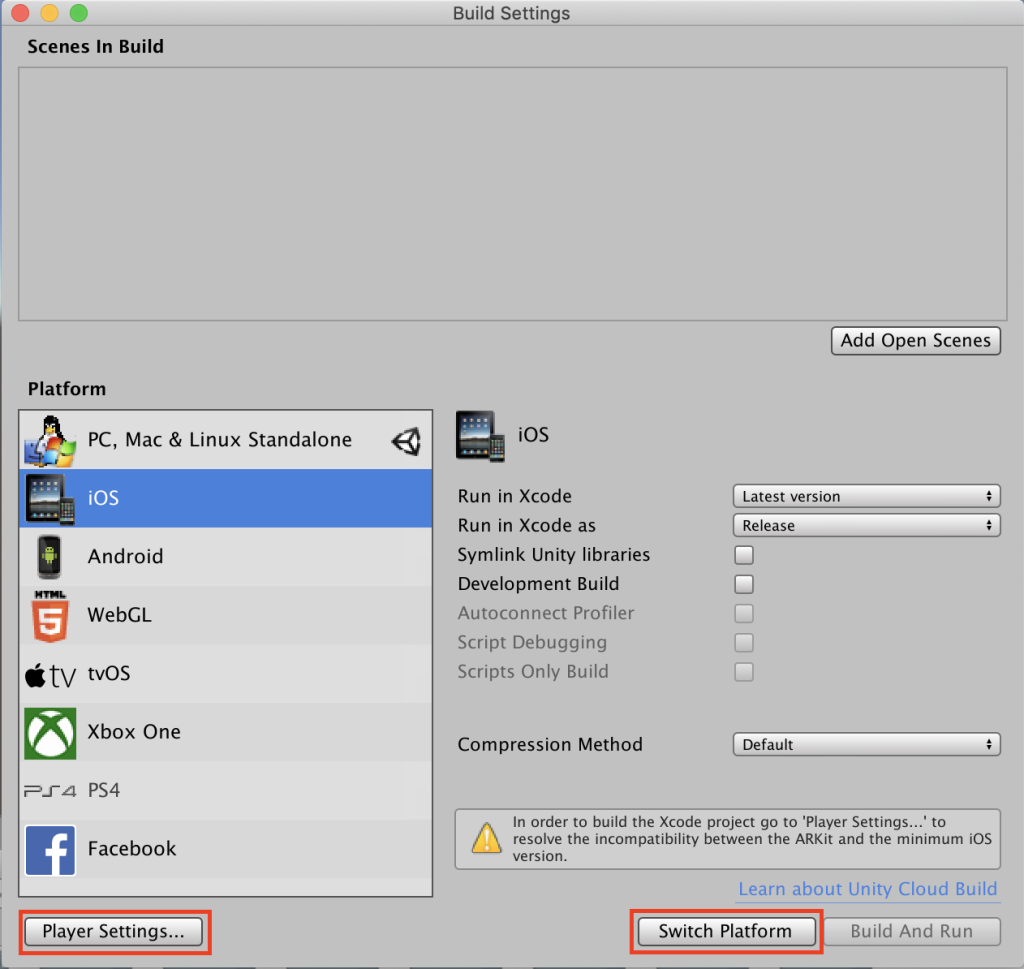
With your project open, navigate to Build Settings from the main menu, File > Build Settings. In the dialogue box that appears select iOS from the list of platforms on the left and select Switch Platform at the bottom of the window. Switching Platforms sets the build target of our current project to iOS. This means that when we build our project in Unity, that process will create an Xcode project.
Next, you’ll need to enter the bundle identifier for our game. A bundle identifier is a string that identifies an app. It’s written in the reverse-DNS style, following the format com.yourCompanyName.yourGameName. Allowed characters are alphanumeric characters, periods and hyphens. You’ll need to change the bundle identifier from the default setting in order to build to your desired platform.
It is important to note, once you have registered a bundle identifier to a Personal Team in Xcode the same bundle identifier cannot be registered to another Apple Developer Program team in the future. This means that while you are testing your game using a free Apple ID and a Personal Team, you should choose a bundle identifier that is for testing only – you won’t be able to use the same bundle identifier to release the game. The way some developer do this is to add “Test” to the end of whatever bundle identifier they were going to use – for example, com.yourCompanyName.yourGameNameTest.
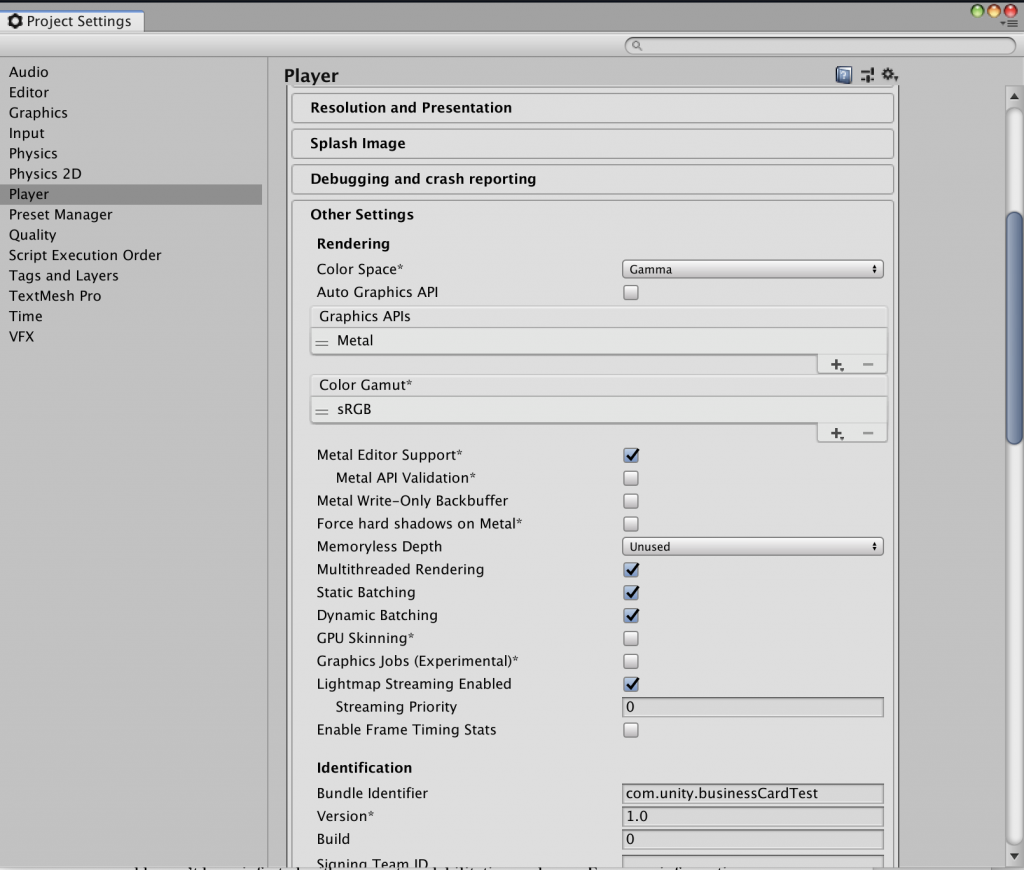
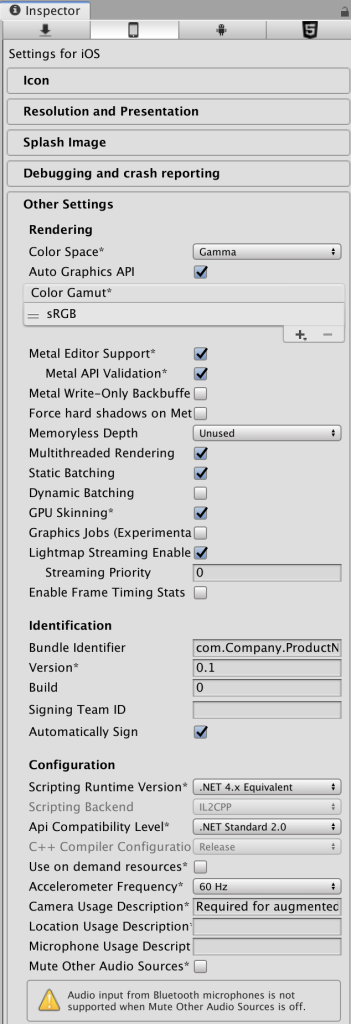
With that said, to change the bundle identifier, open the Player Settings field in the Inspector panel by going to Edit in the main menu, Edit > Project Settings > Player. Expand the section at the bottom called Other Settings and enter your bundle identifier in the Bundle Identifier field.
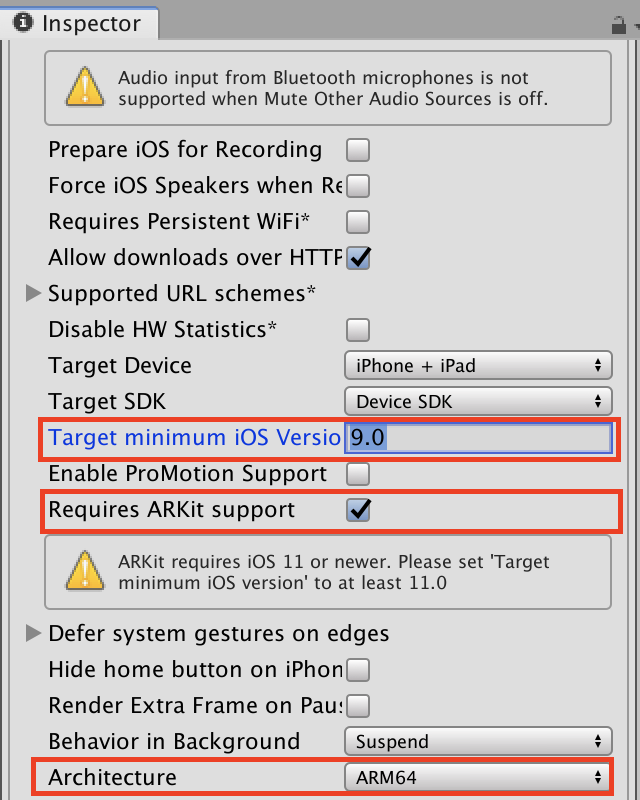
You’ll also need to turn on the Requires ARKit support checkbox. Note that when you do this Unity fills in the Camera Usage Description field with the message “Required for augmented reality support.” This can be any value you want, but it just cannot be blank. You’ll also notice that it gives you a warning that iOS 11.0 or newer is required for ARKit support. So, you’ll need to increase the iOS number in the Target minimum iOS Version field.
The final change you’ll need to make is to the architecture. ARKit only works with ARM64 processors so you’ll need to select ARM64 from the Architecture drop-down menu.
Install AR Foundation & ARKit Package
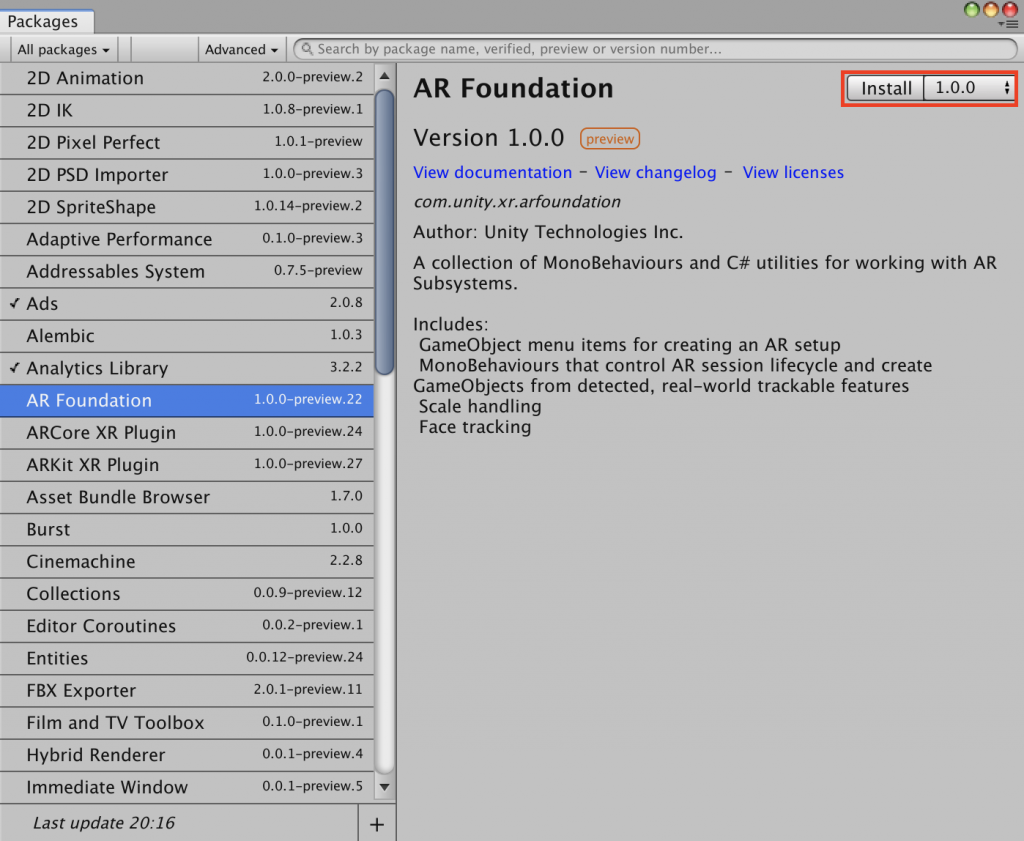
Once you have completely setup up your project for an iOS game, you will need to install the AR Foundation and ARKit packages. To do so, you’ll need to open Unity’s Package Manager by clicking Window > Package Manager. In the dialog box that appears the AR Foundation and ARKit package is not readily available. To see all packages available for install click the Advance button this will open a drop-down menu that allows you to show preview packages. Preview packages are not verified to work with Unity and might be unstable. They are not supported in production environments.
Select the AR Foundation package from the list of packages. The package information appears in the details pane. In the top right-hand corner of the information pane select the version to install, in our case, we will be installing version 1.0 preview 27. Then click the Install button. You will do the same for the ARKit Plugin.
AR Game Configuration
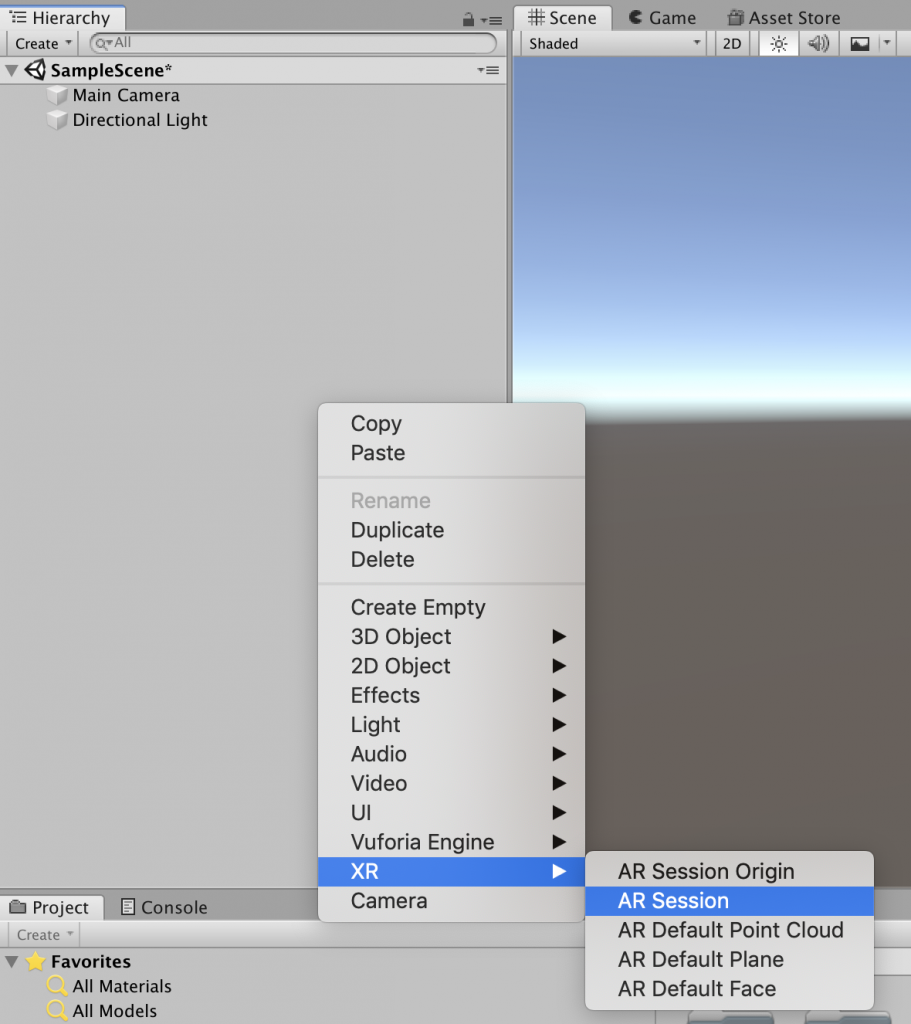
Now if you right-click in your Scene Hierarchy you will notice a new section called XR in the menu that appears. From said menu add an AR Session, controls the lifecycle of an AR experience, enabling or disabling AR on the target platform. The AR Session can be on any Game Object.
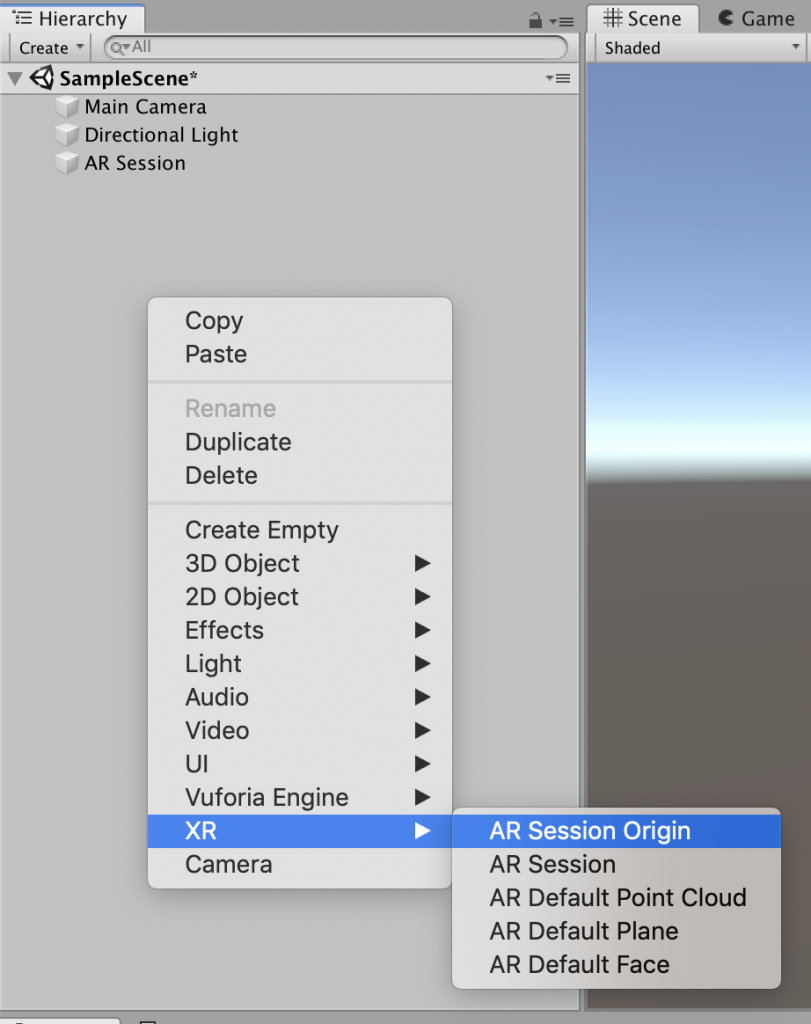
Next, you’ll add an AR Session Origin object by right-clicking Scene Hierarchy and navigating to the XR > AR Session Origin. The AR Session Origin object transforms trackable features (such as planar surfaces and feature points) into their final position, orientation, and scale in the Unity scene. Because AR devices provide their data in “session space”, an unscaled space relative to the beginning of the AR session, the AR Session Origin performs the appropriate transformation into Unity space. Notice that the AR Session Origin object has it’s own AR Camera. So, you no longer need the Main Camera that was included when you create your project. To remove it, right-click on it and Delete.
Go ahead and select the AR Camera from the AR Session Origin drop-down contents and in the Inspector pane tag it as the Main Camera.
Import 3D Model
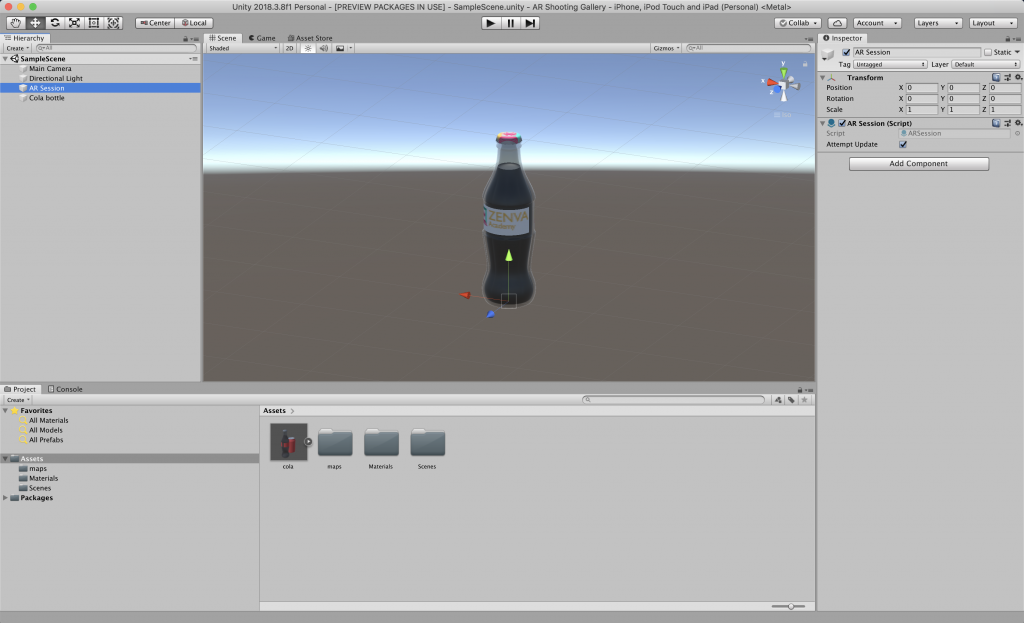
With your game now configured with AR capabilities, you’ll need to import the bottle 3D model that you’ll use for target practice in your game. Download model here. Drag and drop the FBX file into the Assets folder. To add it to your game drag the bottle into the Scene Hierarchy. The model contains a cola can and bottle. You’ll just need the bottle so drag the bottle outside of the Game Object it is in, then delete the Game Object containing the cola can.
The model is just basic cola bottle. It doesn’t look to appealing let’s jazz it up a bit by adding some materials to it. Included in the file that you download is a folder titled maps. This folder contains the necessary images to create your label materials. Drag and drop said folder into your Assets folder.
Design Model Materials
Next, you’ll need to create a folder titled Materials in your Assets folder. To do so, right-click in Assets folder rollover Create in the menu that appears and select Folder. Name it Materials.
First, you’ll want to create the cap material. Navigate into your new Materials folder by double-clicking it. Inside said folder, you once again right click and rollover Create from the menu that appears and select Material. Name the new material Cap. With it selected move over to the Inspector pane from the Shader drop-down select Legacy > Diffuse, click Select inside of the Texture box below and choose the circular cap image in the dialogue box that appears. Do the same for the bottle tag.
For the glass and liquid inside of the bottle, the steps slightly differ. Simply create two materials and name them cola and glass respectively. With the glass material selected, in the Inspector pane select Transparent from the Render Mode drop-down. Under Main Maps section click the white color block, the Color dialog box should appear. Change the Alpa number to 70, color to black and close the dialog box.
With the cola material selected, in the Inspector pane. Under Main Maps section click the white color block, the Color dialog box should appear. Change the color to brown and close the color dialog box.
Assign Material to 3D Bottle Model
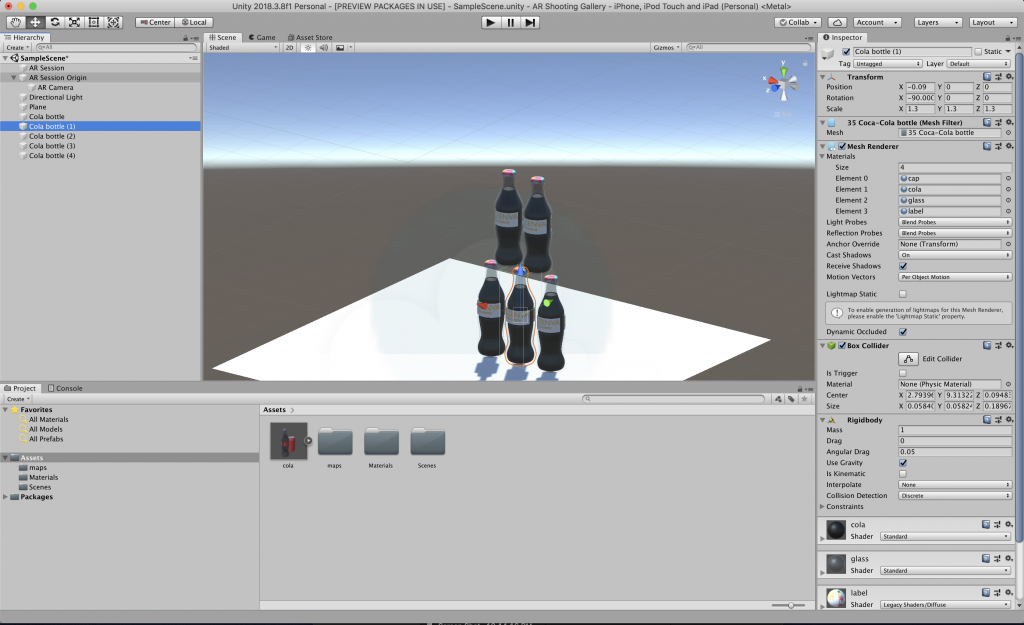
To assign your newly created materials to the bottle, click on the bottle in the Scene Hierarchy, in the Inspector pane drop-down the Materials tab, drag the cap material on to Element 0, the cola material on Element 1, the glass material on Element 2, and the tag material on to Element 3.
3D Bottle Physics
Your bottle now looks a little more refined, but its a little small. Let’s resize it by changing the Scale x, y and z properties to 1.3 respectively.
Now let’s create a plane so that we can keep the bottle on something. Right-click in the Scene Hierarchy and select 3D Object > Plane. Reset your new plane object’s origin in the Transform properties found in the Inspector pane, by right-clicking on the Transform panel and selecting Reset. Resize it by changing the Scale x, y and z properties to 0.1 respectively.
To make your bottle act as it would in the real world, you’ll have to add two physics component to the bottle: Box Collider and Rigidbody. The Box Collider is a basic box-shaped primitive collider. This component is applied to the bottle so that it does not fall through the plane and continuously fall into nothing and to detect the bullets when we shot them. Rigidbody enables your bottle to act under the control of physics. The bottle must contain a Rigidbody to be influenced by gravity, act under added forces via scripting, or interact with other objects through the NVIDIA PhysX physics engine.
To apply said components, make sure your bottle is selected, at the bottom of the Inspector pane click the Add Component button, type in the Box Collider in the search field and select it for the populated list. Do the same to add the Rigidbody component.
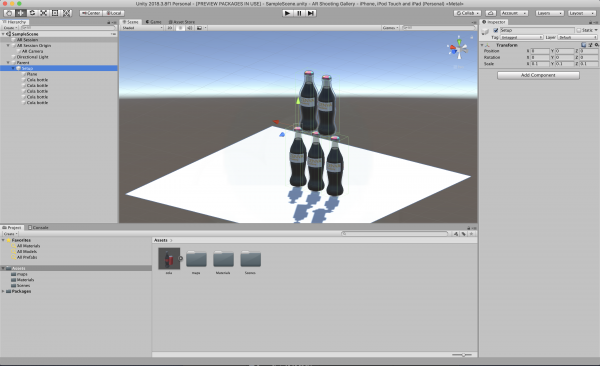
You’re going to need a few more bottles to targets. Go ahead and duplicate your bottle by pressing Cmd+D (Control+D) on your keyboard or right-clicking and selecting Duplicate. Use the handles to move the duplicated bottle into position. Continue to do so till you have stacked five bottles into a triangular shape.
If you were to view the game and deactivate one of the lower tier bottles the top tier bottle would fall over as it would in real life.
Make sure to make the name of all the bottle objects the same. You will see why this is necessary as you go through the tutorial.
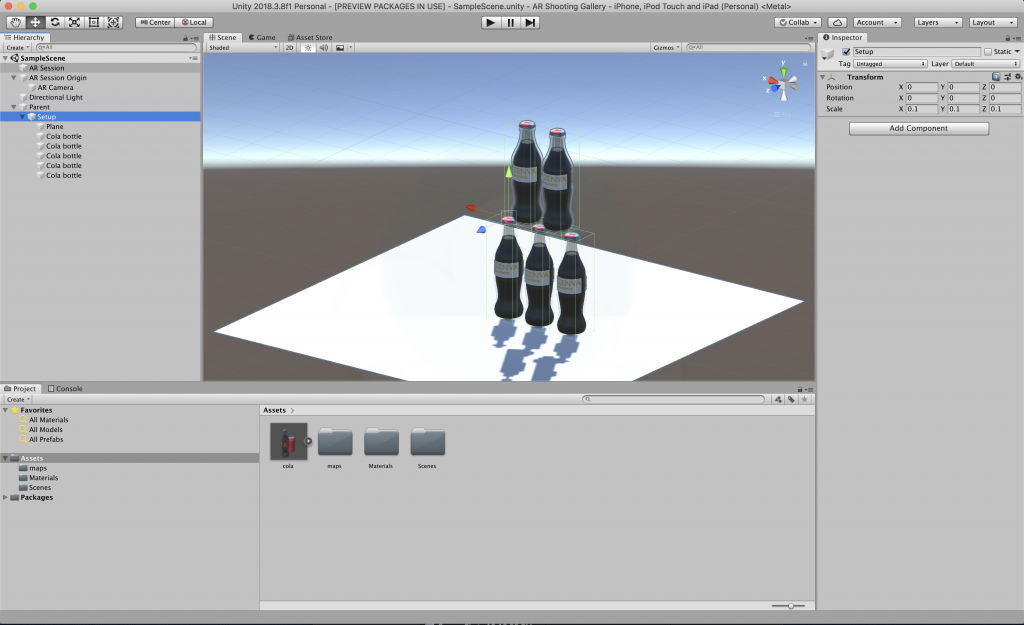
Combined the Plane and bottles into one game object by; right-clicking in the
Scene Hierarchy and select Create Empty. Name your new empty game object Setup. Then select the plane and bottles by, selecting the topmost object, in your case should be the plane, and while holding Shift, click the down arrow till the Plane and all bottles are selected. Then drag your selection onto the Setup game object.
The last thing you’ll need to do is change the origin of the Setup game object. To do so, right-click in the Scene Hierarchy and select 3D Object > 3D Cube. Rename it Parent and reset its origin in the Transform properties found in the Inspector pane, by right-clicking on the Transform panel and selecting Reset. Resize it by changing the Scale x, y and z properties to 10 respectively. Now uncheck its Mesh Renderer and Box Collider. Then drag your Setup game object on to your Parent game object.
You are now done with the initial setup for your carnival-style shooting gallery game.
Conclusion
In this tutorial, you learned how to manipulate the iOS ARKit Plugin to:
- Setup Unity Project to create iOS AR games
- Import 3D Bottle Model
- Design 3D Bottle Model Materials
- Assign Material to 3D Bottle Model
- 3D Bottle Physics
Next time in How to Create an AR Shoot’em Up Gallery Game Part 2, you will learn how to develop the mechanics of your carnival-style shooting gallery game.
Go forth into the AR universe and create more!
