You can access the full course here: Intro to ARKit
Table of contents
Unity Setup
Create a new Unity project. Then in the editor, let’s open the Package Manager window (Window > Package Manager). Let’s begin by showing preview packages.

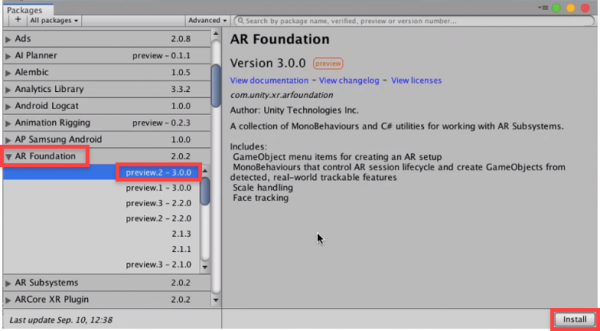
Now find AR Foundation, click on the drop down arrow and select the 3.0.0 preview. Install that. Also install ARKit XR Plugin (preview version 3.0.0).

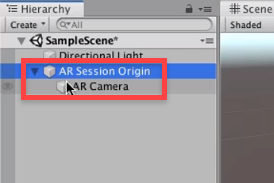
Let’s start by deleting the camera in the scene. Now let’s create the AR Session Origin (right click Hierarchy > XR > AR Session Origin). This determines the center of the world and also has a camera as a child of it.

Next, we can create the AR Session (right click Hierarchy > XR > AR Session). This runs the AR app.
Build Settings
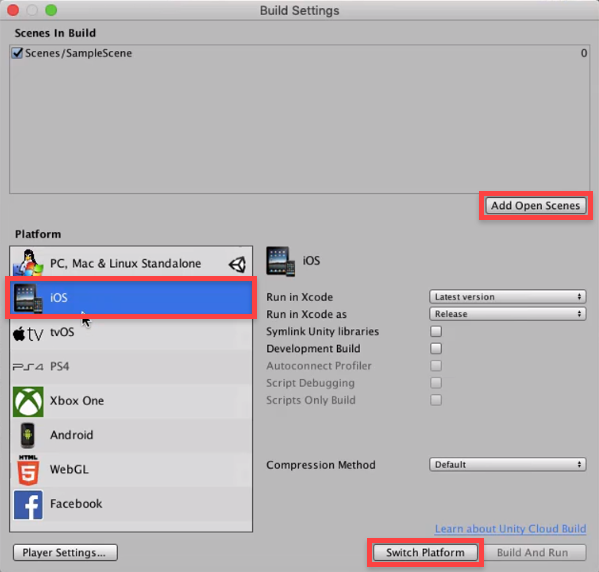
Next, we can open the Build Settings window (File > Build Settings). Here, we can first click the Add Open Scenes button to add the current scene to the build list. Then select the iOS platform and click Switch Platform to convert the editor to iOS.

In the next lesson, we’ll be looking at tracking images.
Transcript
Okay, so, the first thing we want to do is go to the Unity Hub here, and what we’re gonna do is create a brand new Unity project in order to create our ARKit app. So I’m gonna click on the New button up here. Make sure you do have the 3D template selected and we’re gonna enter in a project name. We’ll just go IntroToARKit here. You can save it to wherever you want and then, what we’re gonna do is click Create to create our project.
All right, so here we are inside of Unity, we have the basic scene set up. Now what we’re gonna do is go Window, then Packages Manager. And what we’re doing here in the Packages Manager is going to just be installing some of the packages we need in order to use ARKit, so what we’re gonna do is wait for the packages to load up and find AR Foundation right here. We can click to See all versions and what we want to do is get the 3.0 version, so I’m gonna click on Advanced, then Show preview packages. And this just shows some of the preview packages. Depending on when you’re watching this, 3.0 might be out as a main release, but right now, it is in preview, so we’re just gonna go Show preview packages, click on the 3.0 preview right here, and install that.
Now, the reason why we’re also getting AR Foundation is because Unity originally had the ARKit SDK as a separate thing, but as they’ve introduced AR Foundation, which is a sort of higher level view of AR for working with both the Android and the iOS versions, it’s combined that into one here in AR Foundation. And the ARKit SDK has been added to this as well, so we need to install AR Foundation right here. It shouldn’t take too long to install the assets that we need.
And now that that’s done, we also need to download the platform-specific plugin as well, so what we want to do is, underneath AR Foundation, let’s look for the ARKit XR Plugin, down here. And again, we want to get the 3.0 version of this or really, whatever the most recent version is for you. It might be 4.0, 3.5. We just wanna get the most recent version of this, so we can have many of the new features that ARKit supports in our project. So, I’m gonna click on the 3.0 preview version here and then, click Install.
Now, you do need to make sure that this version is the same as the AR Foundation version, so for me, I’m gonna make sure that they’re both the 3.0 version, as they do need to communicate between each other. And ARKit also requires you to install the AR Foundation package as well, as that is dependent on that package.
Okay, so now that’s done, we can close out of the Package Manager right here and actually begin to create our scene. Now, by default, we have the main camera and directional light. Let’s just delete the main camera, as we’re gonna be adding in an AR-specific camera right now, so let’s right-click on the Hierarchy. We then want to go down to XR and add in a new AR session origin. This just divides the center of the world and adds a couple other components, as well, that we need in order to actually run our AR session. And inside, as a child, we also have the AR camera, which will display what your camera sees as the background and do all of the AR camera movements as well.
Now along with this, we also need to right-click again, go XR, and we need to add in the AR session. This basically runs many of the AR actual processes of calculating the surfaces and all of that, so we can actually get the AR app working as we wish.
Okay, so now that we have that, let’s go up to File here, and we want to do is then go Build Settings. The reason why is because we need to switch over to the iOS version, but first, let’s click on Add Open Scenes to add the current scene to the Scenes in Build. Select the iOS platform right here, so we’ll just click Switch Platform. And if you don’t have this available in the platform list here, you can go to your Installs page on the Unity Hub and click on the three dots next to Unity install to add the iOS module. It’s only a few gigabytes, but it does allow us to then build to iOS devices.
With that done, we can close out of here and that is pretty much it for this lesson. We have our Unity project set up and ready to go for AR. In the next lesson, what we’re gonna be doing is working on tracked images in ARKit and getting that working on our device, so I’ll see you all then in the next lesson.
Interested in continuing? Check out the full Intro to ARKit course, which is part of our Augmented Reality Mini-Degree.


