Table of contents
The camera in VR vs non-VR applications
In Unity, a camera is a device that captures and displays the game world to the user. The way you work with cameras in VR is different to that of normal 3D games and applications, so that is the first thing we will address here.
In a non-VR game, you view the game world through the screen of your computer. So if the player moves and/or rotates the computer, the content of the screen doesn’t change. If they want to look around in such a game, they’ll have to use the mouse or keyboard to rotate the camera. Also, there will be times when they are not in control: for example in a cut scene, where the camera might show the action from different angles.
VR apps work differently. The game world is seen through your headset or HMD. The player can look around, which will, in turn, rotate or translate the camera in the virtual world. The rotation of the camera is read directly from the headset. On a VR experience, it’s always up to the player where they want to look at.
In real life, it would be quite invasive if someone forced your head to look at a certain direction. The same applies to VR. If you try to force a camera rotation onto your users they will most likely abandon your app instantly.
Did you come across any errors in this tutorial? Please let us know by completing this form and we’ll look into it!

FINAL DAYS: Unlock coding courses in Unity, Godot, Unreal, Python and more.
New Project Creation
Now that we’ve covered how the workings of the camera is different in VR and non-VR application, let’s go to Unity and create a basic setup for VR.
Create a new project using the template VR Lightweight RP (Preview). This will allow us to utilize the new Lightweight Render Pipeline, which provides better performance for VR applications. The template will also include a script we’ll be using.
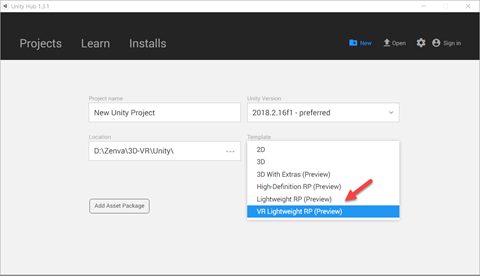
Start by deleting all the game objects you see in the inspector. Then add just a directional light, a camera and a plane. We’ll build our setup from scratch with just the essentials.
XR Rig Setup
The first thing we want is to create a containing object for our VR camera and controllers. This is called an XR rig.
As discussed earlier, we can’t force the rotation or position of the player’s head. The same thing applies for hand controllers. If I keep my arm straight in real life, it shouldn’t be rotating or moving in the game (we are of course assuming we are using a hand tracked controller).
So what if we actually need to move or rotate the player. Say they are on a lift or a vehicle. What we do then is move the containing XR Rig, which will in turn move all of it’s children component (the camera, controllers, etc). Create a basic structure with just empty objects and the camera like the image below:
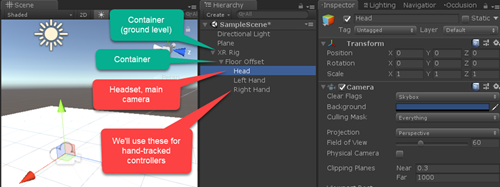
Inside of that object we’ll create an object for the head of the player (this will be the main camera), and objects for both hands (in case you are using hand-tracked controllers). Note that we also have a floor offset object which is something we’ll talk about later.
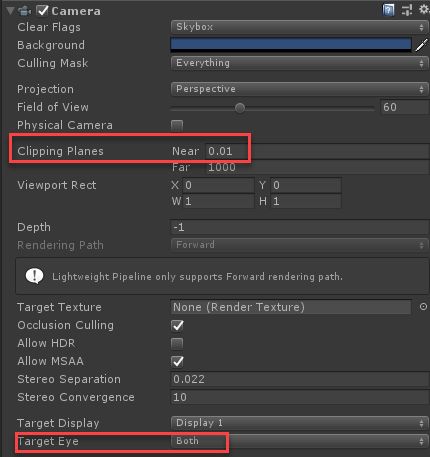
Configuration for the camera component:
TrackedPoseDriver
We want the rotation and possibly the position for these objects to come from the devices themselves. For that, we use the TrackedPoseDriver component. For each element, we need to define what it represents. Note that we haven’t installed any specific platform SDK like the SteamVR SDK or the Oculus SDK. What we are doing here is supported by Unity’s native features.
This component needs to be added to all the elements you’d like to track. In this case, that includes the camera and both hand-tracked controllers. These are the values for the head:
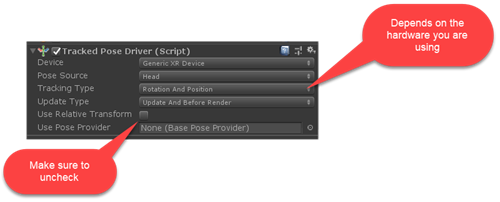
This is what it looks like for the controllers (make sure to set the Pose Source to Left or Right depending on the controller):

Types of VR experiences
There are two main types of VR experiences, which depends on the headset and platform you are using. Some headsets such as the Oculus Go and also Google Card board only do rotation tracking. If you jump or move in the real world, you stay in the same position in the virtual world. This is called 3 degrees of freedom (DOF) tracking or stationary experiences, as the device only tracks rotation in all three axis.
Other headsets such as the Oculus Rift or the Windows MR also track your position in space, which is called 6 DOF or room-scale experiences.
Floor Offset
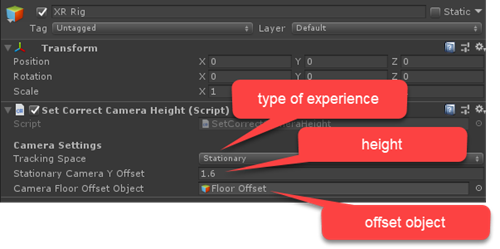
Our XR Rig should account for both cases, so that we can use it in all projects. What really changes in each case if how the position (and, in particular, the height) of the camera and controller is set. In stationary experiences the position needs to be manually set. In room-scale experiences, on the other hand, your HMD and controllers will pass on their position to the game.
The FloorOffset object we created previously will come to the rescue. In a stationary experience we should give this object a height, so that the camera is not at ground level. Room-scale experiences will require this object to be placed on the floor, at the origin of it’s parent, as the actual position of our camera and controllers will come from the tracking.
What we need a script that can do the following:
- Checks whether we are in a stationary or room-scale experience
- If we are on a stationary experience, give FloorOffset a sensitive value (say the average height of a person)
- If we are on a room-scale experience, position FloorOffset on the ground.
It turns out Unity provides such a script and it’s already in our project (provided you used the VR Lightweight RP template). Open the file SetCorrectCameraHeight.cs located under Assets/Scripts:
using UnityEngine;
using UnityEngine.XR;

public class SetCorrectCameraHeight : MonoBehaviour
{
    enum TrackingSpace
    {
        Stationary,
        RoomScale
    }

    [Header("Camera Settings")]

    [SerializeField]
    [Tooltip("Decide if experience is Room Scale or Stationary. Note this option does nothing for mobile VR experiences, these experience will default to Stationary")]
    TrackingSpace m_TrackingSpace = TrackingSpace.Stationary;

    [SerializeField]
    [Tooltip("Camera Height - overwritten by device settings when using Room Scale ")]
    float m_StationaryCameraYOffset = 1.36144f;

    [SerializeField]
    [Tooltip("GameObject to move to desired height off the floor (defaults to this object if none provided)")]
    GameObject m_CameraFloorOffsetObject;

    void Awake()
    {
        if (!m_CameraFloorOffsetObject)
        {
            Debug.LogWarning("No camera container specified for VR Rig, using attached GameObject");
            m_CameraFloorOffsetObject = this.gameObject;
        }

    }

    void Start()
    {
        SetCameraHeight();
    }

    void SetCameraHeight()
    {
        float cameraYOffset = m_StationaryCameraYOffset;
        if (m_TrackingSpace == TrackingSpace.Stationary)
        {
            XRDevice.SetTrackingSpaceType(TrackingSpaceType.Stationary);
            InputTracking.Recenter();
        }
        else if (m_TrackingSpace == TrackingSpace.RoomScale)
        {
            if (XRDevice.SetTrackingSpaceType(TrackingSpaceType.RoomScale))
                cameraYOffset = 0;
        }

        //Move camera to correct height
        if (m_CameraFloorOffsetObject)
            m_CameraFloorOffsetObject.transform.localPosition = new Vector3(m_CameraFloorOffsetObject.transform.localPosition.x, cameraYOffset, m_CameraFloorOffsetObject.transform.localPosition.z);
    }
}
Add this script as a component to your XR Rig object. You can set whether your app is a stationary or room-scale experience. The reason why it lets you decide is because 6 DOF headsets can also run 3 DOF experiences. For instance, the Windows MR headset has a mode where it only detects rotation for the headset. If you select room-scale and your headset doesn’t support it, it will default to stationary, so that’s quite flexible.
Positioning the controllers
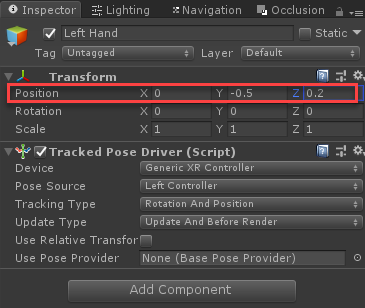
The controller(s) are inside of the same offset as the camera, as the same principle applies to them. If we are on a room-scale experience, their position will be set by the tracking. In a stationary experience, we can give them a fixed position, for instance, 0.5 meters underneath the head, and 0.2 meters in front of the head (these are arbitrary numbers, you could also move the right controller a bit to right, and likewise for the left controller):
Making the controllers visible
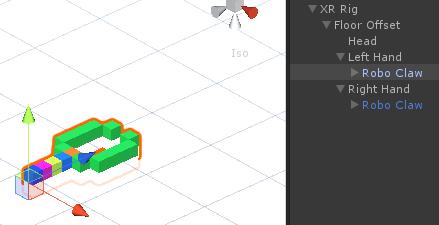
If we want to see our controller we need to give it a 3D model. All we need to do is place the 3D models inside of the controller objects we have created. For the purpose of this project I’ll be importing file I created using MagicaVoxel:
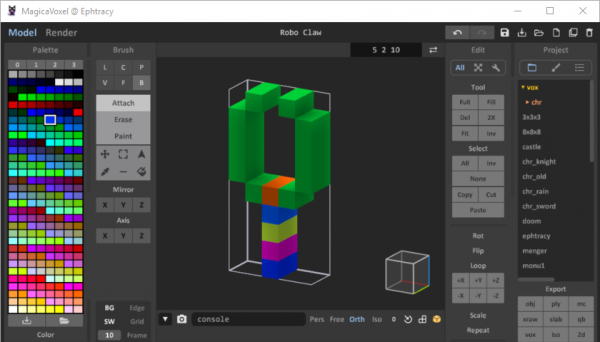
To bring this into Unity:
- In MagicaVoxel, export as “OBJ”
- Drag the exported OBJ and PNG files into Unity
- Drag the OBJ file into your project, and drag the PNG file on top of it, so that the material is applied. Scale up or down if needed, then save as a prefab and you are good to go!
- Now place the hand inside of the controller(s) you created. Make sure the hand points at the same direction than the forward coordinate of the controller object:
Running the project
Now, the last thing we need in order to run this hello world VR app is to go to Build Settings, pick the platform we are developing for, and then make sure to enable XR and select the correct XR platform:
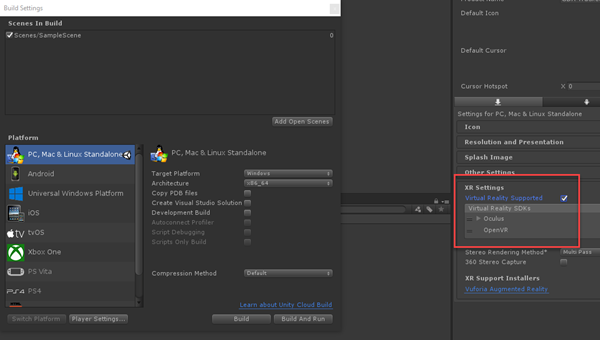
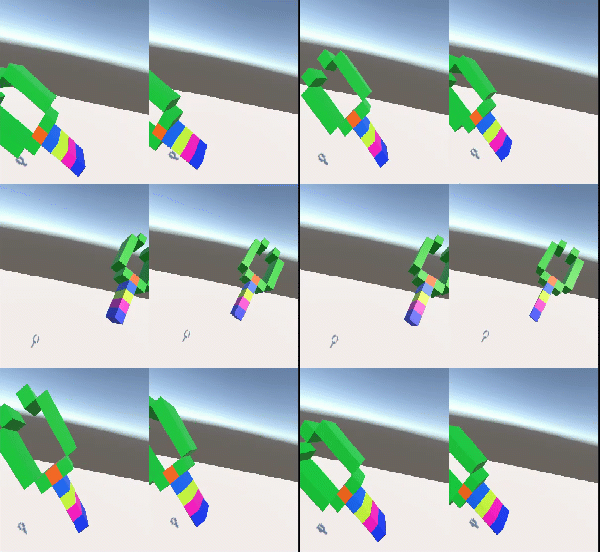
If you are developing for an Android-based headset such as the Google Cardboard, GearVR or Oculus Go, you’ll need to setup the Android SDK and build the app. In this case, I’m using the Oculus Rift, so I can just press Play in the Editor and run my application.
Useful script for development
When running a VR app on the Editor there is no easy way to “simulate” the camera movement, so I created a simple script which allows you to move the camera with the mouse (by “dragging” with the right click). Feel free to use it in your projects (assign it as a component to your Main Camera – the Head object in this case):
// Developed by Zenva
// MIT LICENSE: https://opensource.org/licenses/MIT

using System;
using System.Collections;
using System.Collections.Generic;
using UnityEngine;

//Usage: just drop into your Camera in the editor
//you can drag the view with the right mouse btn (left btn is to trigger actions)
//won't work when the HMD is connected as the HMD will take over the camera's transferm
namespace Zenva
{
    public class DragCamera : MonoBehaviour {
        #if UNITY_EDITOR

        // flag to keep track whether we are dragging or not
        bool isDragging = false;

        // starting point of a camera movement
        float startMouseX;
        float startMouseY;

        // Camera component
        Camera cam;

        // Use this for initialization
        void Start () {
            // Get our camera component
            cam = GetComponent<Camera>();
	    }

	    // Update is called once per frame
	    void Update () {

            // if we press the left button and we haven't started dragging
            if(Input.GetMouseButtonDown(1) && !isDragging )
            {
                // set the flag to true
                isDragging = true;

                // save the mouse starting position
                startMouseX = Input.mousePosition.x;
                startMouseY = Input.mousePosition.y;
            }
            // if we are not pressing the left btn, and we were dragging
            else if(Input.GetMouseButtonUp(1) && isDragging)
            {
                // set the flag to false
                isDragging = false;
            }
        }

        void LateUpdate()
        {
            // Check if we are dragging
            if(isDragging)
            {
                //Calculate current mouse position
                float endMouseX = Input.mousePosition.x;
                float endMouseY = Input.mousePosition.y;

                //Difference (in screen coordinates)
                float diffX = endMouseX - startMouseX;
                float diffY = endMouseY - startMouseY;

                //New center of the screen
                float newCenterX = Screen.width / 2 + diffX;
                float newCenterY = Screen.height / 2 + diffY;

                //Get the world coordinate , this is where we want to look at
                Vector3 LookHerePoint = cam.ScreenToWorldPoint(new Vector3(newCenterX, newCenterY, cam.nearClipPlane));

                //Make our camera look at the "LookHerePoint"
                transform.LookAt(LookHerePoint);

                //starting position for the next call
                startMouseX = endMouseX;
                startMouseY = endMouseY;
            }
        }

        #endif
    }
}
Conclusion
And that’s it for this tutorial! You now have the knowledge of the basic setup for VR! Go forth and show us what you can make with your newfound powers.

