You can access the full course here: Hand Grabbing Controllers in VR
Table of contents
Project Setup
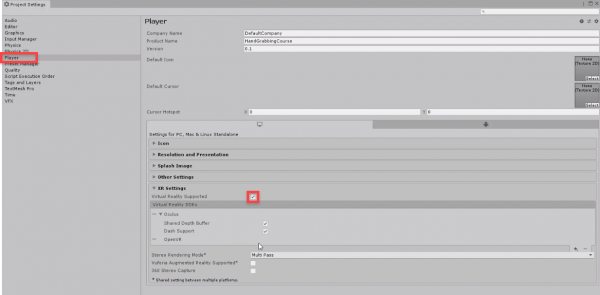
Create a new new Unity project so we can begin with the course. First, we want the ability to actually test out our game inside of the editor, in VR. In order to do this, firstly make sure that you have your headset plugged in and setup. Then we can go to the Project Settings window (Edit > Project Settings) and click on the Player tab. Down in XR Settings, enable Virtual Reality Supported.
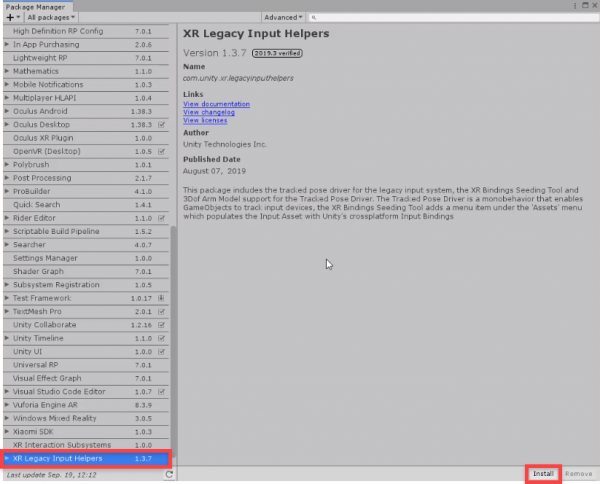
A good thing with Unity, is that they have a very flexible and easy to use VR system. We don’t need to worry about specific VR devices as Unity packages them all into one API. We’re going to be using a component that can fetch the headset/controller’s position and rotation, then apply it to a certain object. Let’s go to the Package Manager window (Window > Package Manager), wait for the packages to load, then select XR Legacy Input Helpers. Click Install.
Now we can import the assets we need. These can be downloaded from the course files. Or from the Zenva VR repo here on GitHub.
Scene Setup
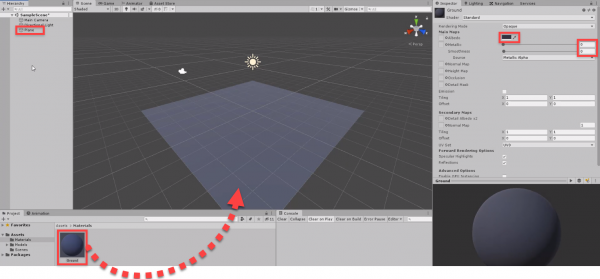
In the scene, let’s create a new plane for the ground (right click Hierarchy > 3D Object > Plane). In the project panel, let’s then create a new material and apply it to the plane.
- Set the Albedo color to dark grey / blue
- Set the Metallic and Smoothness to 0
Creating the XR Rig
Now let’s create our XR rig (or VR rig). This is the collection of objects that make up the player (head camera, hands, etc).
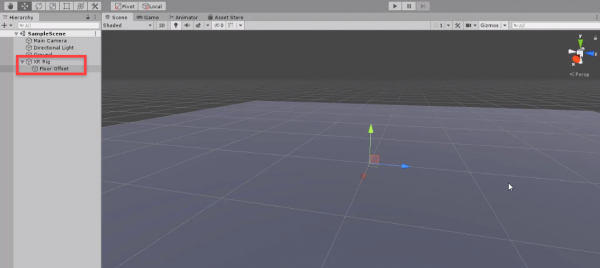
Begin by creating a new empty GameObject called XR Rig.
- Set the Position to 0, 0, 0
Then as a child of that, create a new empty GameObject called Floor Offset. This is needed to add your real-world height to the controller. Since your headset knows your height (manually entered or calculated from the surroundings), it will add that to the Y axis.
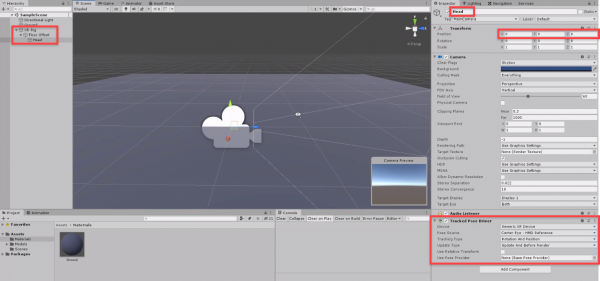
Next, drag the Main Camera in as a child of the floor offset. Rename it to Head. Add a Tracked Pose Driver component. This will receive the updated position and rotation of the headset and apply it to the camera.
- Set the Position to 0, 0, 0
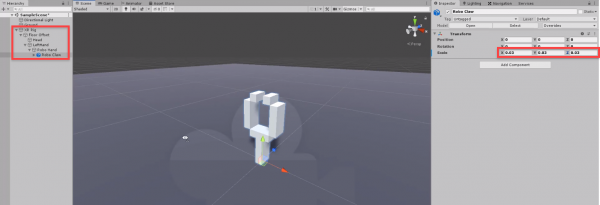
Let’s now work on our hands. Create a new empty GameObject called LeftHand as a child of floor offset.
- As a child of that, create a new empty GameObject called Robo Hand
- As a child of that, drag in the Robo Claw model
- Set the Scale to 0.03
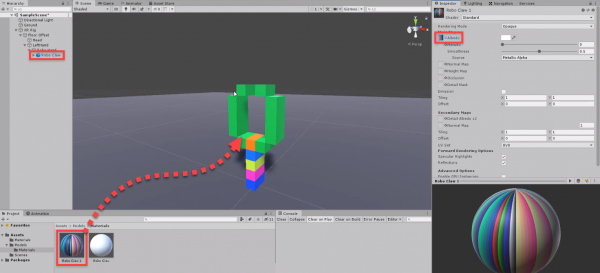
For the texture, go to the Models/Materials folder and select the Robo Claw material.
- Set the Albedo texture to the Robo Claw image
- Drag and drop this onto the model
Next, let’s select the robo claw model and set the X Rotation to 90. This is because we want the claw to be facing forwards.
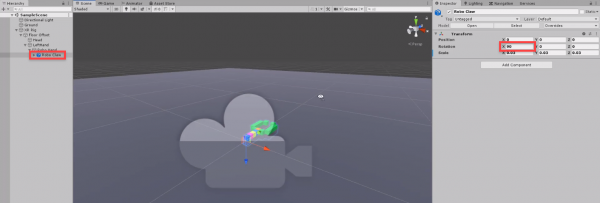
Finally, we can attach a Tracked Pose Driver component to the LeftHand object.
- Set the Device to Generic XR Controller
- Set the Pose Source to Left Controller

With the left hand done, let’s duplicate it (Ctrl + D) and rename it to RightHand. All we need to change on this object, is the tracked pose driver’s Pose Source to Right Controller.

We can now test it out in the editor. Make sure you have your device plugged in and setup, then click the Play button. In the next lesson we’ll continue on setting up the scene and fix a few issues.
Transcript
Welcome, everyone. In this lesson we are just gonna be setting up our Unity project here before we jump into scripting. We’ll be setting up our scene, we’ll be setting up all the assets we need, as well as setting up the hierarchy and just getting our project basically built, ready for the scripts that we’re gonna make further on in this course.
So first of all what we want to do is open up a brand new unity project. Here I am in mine right here. What we’re gonna do first of all is make sure that we are running basically virtual reality, because if you do have a hand track controller VR headset for this one, you can actually test it out inside the editor – which is what we’re gonna do for this course. And to actually make sure that Unity knows that this project is indeed a virtual reality project, we want to basically tell them that.
So let’s go up to edit, project settings, and then in here, let’s go player, and then under the XR settings tab here, what we want to do is just enable virtual reality supported. There we go and as you can see, this information here popped up, should be all good. We can now exit out of this window.
Something else we need as well is a Unity package and that is going to be the XR legacy input helpers. Now what this is, it is a component that basically can access the position, the rotation, and other information from either the headset, the controllers, basically any sort of XR device. These components can access that information and translate that to movement inside of Unity. Let’s go window, package manager, and inside the package manager here, we’ll just wait for all the packages to load up.
Now the thing about the XR legacy input helpers which is here at the bottom, is that this is not really supported by Unity anymore. They are going to have a newer version of this coming out in the future but for now, this is what we’re gonna be using. So let’s just install this here. And when that’s installed we can just exit out of this window here.
And now we can begin to import the assets we need. So first of all, what we’re gonna be doing is importing our model, now we’re gonna use a model hand, you can really use whatever sort of hand model you want but for us, we’re just gonna use a robot claw. So here I’m gonna create a new folder, I’m gonna call this one our models, oops, rename this folder here, gonna call this one our models. And all of these assets that I’m gonna be creating now can be found in the included course files which you can download. Or you can go onto the Zenva VR Github repo link which will be down in the lesson summaries, and that will give you the entire Zenva VR library for you to use.
And inside of this folder, I’m going to be importing our model and texture for the robo claw right here. Okay so we got that all set up.
Now what we need to do is start to actually build our scene because our scene right now, there’s nothing in it, and we need to get some basic stuff set up such as a floor, maybe a surface, maybe some objects we can then grab, and then we also need to make our rig which is going to be the actual player and your hands.
So what I’m gonna do here is – I’m gonna first of all, delete the main the camera, actually no, we’re gonna leave the main camera here. Instead, I’m gonna create a new 3-D object plane, I’m gonna actually create then a new folder in here called materials, actually no, oops. I’m gonna create a new folder here called materials not create a new material.
So I’m gonna call this folder here materials and inside this folder let’s create a brand new material. And this material here is gonna be called the ground. We can drag this on here, smoothness to zero, and we can give it an albedo color of, let’s just make it a sort of dark blue like that, there we go. Let’s rename this plane here to ground, and now what we can do is actually start to set up our XR rig. What this is gonna be is basically a container of various different objects that is going to build up our VR player.
So here I’m gonna right-click, create empty, I’m gonna call this one here our XR rig. Now, we wanna keep this XR rig here at zero on the y-axis, we want to keep this on the surface of whatever ground we’re on because when we actually boot up into VR, once this game loads up, what it’s gonna do is the headset is already gonna know how high off the ground you are, and then it’s gonna automatically add that height on top.
So what we also then wanna do as a child of XR rig, create another empty object, and this here is going to be the floor offset. Now what the floor offset is, is basically an object that can be used in two circumstances. Because since there are two types of VR experiences, one where you are stationary, and one where you are basically room-scale, where you can move around in 3-D space, we want to basically accommodate for both of those. We want to be able to have a set height for a player if they’re in a stationary experience which will be added on to this at the start of the game. Otherwise, if it is a room-scale experience, then this floor offset will just remain where it is and the camera will get a different y position based on what the headset gives it.
So as a child of this floor offset, let’s drag in the main camera. I’m gonna rename this one here to head. And on this main camera what we want to do is actually add a component, and we want to add in the Trackposedriver right here. And this is the component I was talking about before, this is the component that will actually allow us to get information from the headset, get its position, its rotation, its movement, and then translate that over to this real camera inside Unity. And after this, what we also want to do is center up the camera as well, so let’s set the camera’s position to zero, zero, zero so it’s nice in the center here.
And now also what we’re going to do then is add in our hands. So as a child of floor offset, let’s create a new empty object here. Let’s rename this one here to our left hand, and as a child of this I’m gonna create a new empty object, I’m gonna call this one our robo hand, and as a child of this robo hand we are gonna drag in the robo claw model. It’s very large at the moment so let’s actually set this scale here to 0.03, there we go, a bit more reasonable size there. We can also then drag on the material, I’m just gonna drag on this material here and set the albedo texture to be this robo claw here, there we go, got that textured.
And with its rotation, we don’t want this facing up ’cause if we look at our left hand here, you’ll see that the blue axis is facing this direction, this is the forward direction, this is the direction that your hand will be pointing when you’re holding your controller. So we want this robo claw to be facing along the blue axis, the forward direction. So we’re gonna get our robo claw here, and we’re just gonna rotate it 90 on the x-axis like that. And there we go, that’s basically it for the left hand here.
We do also need to attach a Trackposedriver to this as well since this is another XR device that we wanna be tracked, so we’ll add that there. And this time we are going to change the device to generic XR controller, and the pose source is going to be the left controller as well, there we go, got that all setup. Now to do the right hand we can just actually just duplicate the left hand here, so we’ll duplicate that and here we’ll just go right hand. And all we need to do is change the pose source from left controller to right controller.
And there we go, that is pretty much it. That is our XR rig set up and ready to go.
Now, if you do have your headset plugged into your computer and set up, what we can do is actually test this out and basically see if it works. So here we are, and as you can see, it works but there are a few issues that we’re gonna be addressing later. So there we go, we got it actually working, we can test out inside of the editor now.
And what we’re gonna do in the next lesson is fix a few bugs you did see that the claw did start kind of disappear when they got close to our face, that is due to the clipping plane being not close enough to our face. And we’ll fix a few other things as well such as actually getting our height added on top of our initial position. So, I’ll see you all then in the next lesson.
Interested in continuing? Check out the full Hand Grabbing Controllers in VR course, which is part of our Virtual Reality Mini-Degree.


