You can access the full course here: WebVR for Beginners – Build VR Websites with A-Frame
Table of contents
Part 1
Rotation Scaling Parenting
Learning Goals
- Rotation transform
- Scale transform
- Parent/children objects
- Intro to 3D modelling concepts
Go to https://aframe.io/community to get access to the documentation and Github repository of the A-Frame Library. You can also sign up for the A-Frame Slack to join the support network.
In this lesson, we will continue on exploring A-Frame’s core foundations, using the same file created in the previous lesson.
Rotation transform
A 3D object (a mesh or a model) is made out of the 3 elements: vertices, edges, and faces.
A vertex is a point in space. A vertex has coordinates x, y, and z. Connecting two vertices creates an edge. If you connect three or more vertices in a loop, you’ve created a face.

In 3D modelling, every object in a Scene has a Transform. It is used to manipulate the position, rotation, and scale of the object. You can transform these properties for the x, y, and z axis and the default values are set as such:
- Position: 0, 0, 0
- Rotation: 0, 0, 0
- Scale: 1, 1, 1
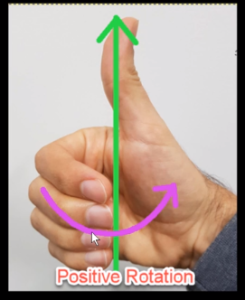
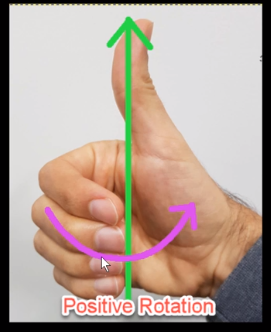
Since A-Frame is a right-handed coordinate system, the rotation value can be defined by the direction your right-hand curls into, when your thumb is pointing at the positive direction of the chosen axis. In this example below, the thumb is pointing at the positive y-axis and thus the direction of the positive y-axis is indicated by the other fingers.
To rotate the box in our scene, simply assign rotation = “x y z”.
<html>
  <head>
    <script src="https://aframe.io/releases/1.0.4/aframe.min.js"></script>
  </head>
  <body>
    <a-scene>
      <a-box position="1 0.5 -2" rotation="0 45 0" color ="#B7950B"></a-box>
    </a-scene>
  </body>
</html>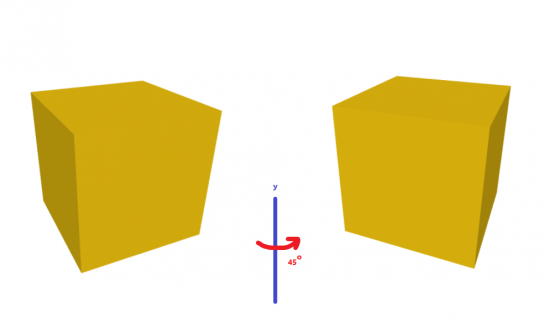
Scale transform
By setting a scale value, an object gets multiplied by the value to increase and decrease its size. For example, setting a scale value of 2 will double the size of the object.
This applies to each axis separately. For example, an x-scale value of 1.5 stretches the object to 150% of its original width. A y-scale value of 0.5 halves the height of the object.
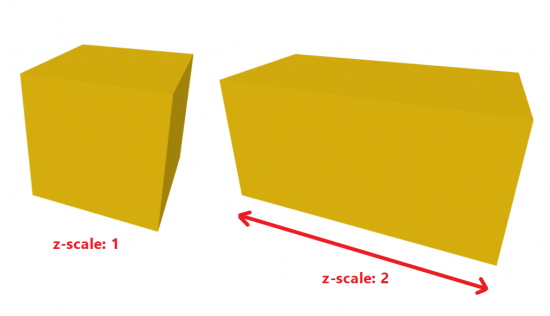
A scale transform can be applied by adding: scale=”x y z”
<html>
  <head>
    <script src="https://aframe.io/releases/1.0.4/aframe.min.js"></script>
  </head>
  <body>
    <a-scene>
      <a-box position="3 0 -2" rotation="0 45 0" scale="1 1 1" color ="#B7950B">
      <a-box position="1 0 -2" rotation="0 45 0" scale="2 1 0.5" color ="#B7950B"></a-box>
    </a-scene>
  </body>
</html>

Parent/children objects
There is also an additional option in Transform which is to parent an object to another. When an object is a parent of another object, changing the parent’s transform will affect the child’s transform as well.
To show an example, we will create an Entity in order to make it a parent of our box.
<html>
  <head>
    <script src="https://aframe.io/releases/1.0.4/aframe.min.js"></script>
  </head>
  <body>
    <a-scene>
      <a-box position="3 0 -2" rotation="0 45 0" scale="1 1 1" color ="#B7950B">
      <a-box position="1 0 -2" rotation="0 45 0" scale="2 1 0.5" color ="#B7950B"></a-box>
      <a-entity></a-entity>
    </a-scene>
  </body>
</html>
An Entity is like an empty state of an object that does not have a geometry, yet can store Transform values.
To make an entity store an object, simply create an object before closing with </a-entity>.
<html>
  <head>
    <script src="https://aframe.io/releases/1.0.4/aframe.min.js"></script>
  </head>
  <body>
    <a-scene>
      <a-box position="3 0 -2" rotation="0 45 0" scale="1 1 1" color ="#B7950B">
      <a-box position="1 0 -2" rotation="0 45 0" scale="2 1 0.5" color ="#B7950B"></a-box>
      <a-entity position="-2 0 -1">
        <a-box position="0 0 0" color = "#215e43"></a-box>
      </a-entity>
    </a-scene>
  </body>
</html>
Any object created within this entity will take the position of the parent (entity) as the origin.

A green box is created at the parent entity’s position of -2, 0, -1
Summary
- Meshes/3D models are made of vertices, edges and faces
- In a right-handed coordinate system, rotation value can be defined by the direction your right-hand curls into, when your thumb is pointing at the positive direction of the chosen axis.

- Scale multiplies the size on an axis by a number.
- Scale of 1 = no changes (default)
- Scale >1 = increase in size
- Scale <1 = decrease in size
- Objects in A-Frame can have children objects
- Behind the scenes, objects in A-Frame are entities with other behaviours such as geometry
- Transforms of the parent are applied to the children
- Children’s origin for coordinates is that of the parent
Part 2
Learning Goals
- Loading a 360-degree photo
- Adding a reticle
- Making a box disappear when you ‘click’ on it with the reticle
A-Frame makes turning a 2D image into a 3D visualization incredibly easy. First, we need an image that has an Equirectangular projection.
Equirectangular projection maps a 3D scene onto a 2D image by conveying the scene visible in all directions, except for right above the viewer’s head and under their feet.
Such images can be captured with most 360-degree cameras as well as smartphones. Alternatively, you can acquire an image from the A-Frame 360 image gallery: https://aframe-gallery.glitch.me/
Loading a 360-degree photo
To create a 360-degree scene, import the image into your project:
<a-scene>
 <a-assets>
  <img src="images/equirectangular-360-photo.jpg" id="360photo">
 </a-assets>
</a-scene>
We can simply use the <a-sky> element to contain the image:
<a-scene>
 <a-assets>
   <img src="images/equirectangular-360-photo.jpg" id="360photo">
 </a-assets>
 <a-sky src="#360photo"><</a-sky>
</a-scene>
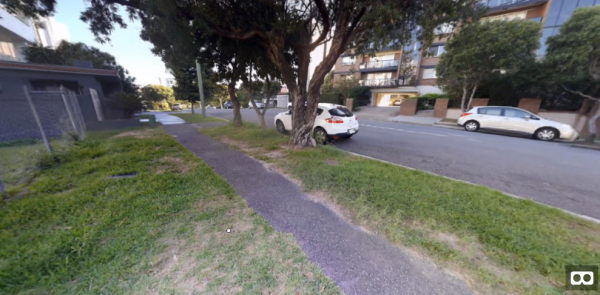
The scene is created with an image wrapping around the camera.
Adding a reticule
Let’s have a look at this scene in the visual inspector (Ctrl+Alt+I)
You can add a camera to the scene using <a-entity>, then take control of the camera using a look-controls element.
<a-entity camera look-controls></a-entity>
To add a cursor to our camera, add <a-cursor> attribute within <a-entity>:
<a-entity camera look-controls position="0 1.6 0">
 <a-cursor color="cyan"></a-cursor>
</a-entity>
A cursor now appears at the centre of the screen.
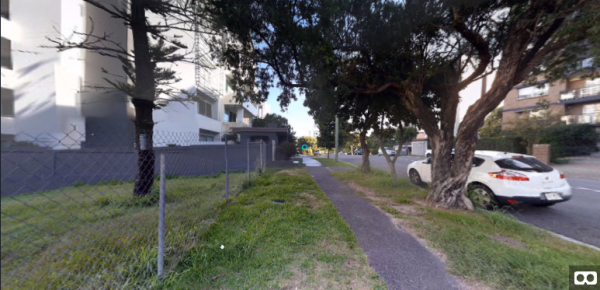
For more information on A-Frame cursor, refer to the documentation:
https://aframe.io/docs/1.0.0/components/cursor.html
Interactive behaviour
We’ll implement a basic interaction so that when you click on a box, it disappears. Let’s start by creating a simple box:
<a-box color="red" position="2 1 -4"></a-box>
Within <a-box>, you can add <a-animation> to allow interactive behaviour.
<a-animation attribute=” “> can be used to specify which property value is to animate. For example, to make a box disappear, we can set the ‘visible’ attribute to ‘false’. We can also use begin=” ” to set an event condition that triggers the animation.
<a-box color="red" position="2 1 -4">
  <a-animation attribute="visible" to="false" begin="click"></a-animation>
</a-box>
This will allow us to click on the box and have the box change its visibility property to false.
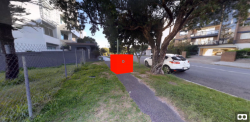
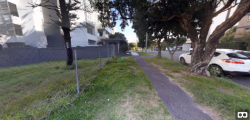
<html>
  <head>
    <script src="https://aframe.io/releases/1.0.4/aframe.min.js"></script>
  </head>
  <body>
    <a-scene>
     <a-assets>
       <img src="images/equirectangular-360-photo.jpg" id="360photo">
     </a-assets>
    <a-sky src="#360photo"></a-sky>
    <a-entity camera look-controls position="0 1.6 0">
        <a-cursor color="cyan"></a-cursor>
    </a-entity>
    <a-box color="red" position="2 1 -4">
        <a-animation attribute="visible" to="false" begin="click"></a-animation>
    </a-box>
    </a-scene>
  </body>
</html>
Summary
- Load asset (same as any image)
- Assign it as a src to a <a-sky> element
- 360-degree photos can be taken with any smartphone
- Must be on an equirectangular projection
- Aspect ratio 2:1 for a full sphere
- Reticule
- ‘Mouse cursor’ in VR
- Must add a camera entity and place an a-cursor element inside
- A-Frame is compatible with most VR platforms in the market
- Animation
- Allows us to change a property value to a different state
- ‘attribute‘ specifies the property to be changed
- ‘to‘ specifies the end value
- ‘begin‘ specifies the condition of the animation
- Documentation: https://aframe.io/docs/1.0.0/components/animation.html
Transcript Part 1
Hello and welcome to the course. My name is Pablo Farias Navarro and I’ll be your instructor. In this course, we are going to create simple virtual reality website using the A-Frame Library.
Now the A-Frame Library works on WebVR. WebVR is an open standard to bring virtual reality to the browser. This works in all current browsers and with all current VR platforms, mobile or desktop. So if you open this website, for example, from a phone that has Google Cardboard, you can see virtual reality or if you connect a virtual reality headset, you can see the virtual reality and if you don’t have a virtual reality headset or you’re not interested in getting something for virtual reality, you can still feel these experiences that are just a website. So they can be embedded on a webpage or they can be pulled on the web. So that is quite amazing because we are in this course, we’re only using HTML to build this website.
So we are creating some interactions here in this page so we can see them all. So we can have some animations and make an object disappear or make an object react to whether you are looking at them or not with the reticle which is the cursor. So we can have different types of things happening here and also we are gonna see how to import existing 3D models into this virtual reality experience.
Now our main learning goals here. So by the end of this course, you’ll learn to create simple and virtual reality websites like what you saw. We’ll be doing a couple of other small demos as well. So you’ll learn the basics of the A-Frame library. You’ll be working with the primitive shapes like cubes and spheres, triangles, cylinders, cones. We’ll learn about the coordinate systems and also how to bring in the 360 photos. What are 360 photos? How to load them into a website and we’ll add the reticle which is like the mouse cursor that we saw and do some basic things with animations and bringing those 3D value as well.
Now the requirements of this course and the only requirement of this course is basic knowledge of HTML. If you have never done any HTML before, you can find a free course in all e-learning platforms, you can find it and you will need a code editor for which I will be using Atom and you’ll need also a local web server but that is, we’ll cover how to install one in the course so don’t worry about that. Now you don’t need to know any Javascript because we’re not going to be doing Javascript in this course. So we’re only going to be using the clarity of HTML aspect of this A-Frame library.
Now everything you learn here is applicable to all different areas. You can create experiences like this for training, for education purposes. You can use this for tourism or for real estate, for all industries really. There is space to innovate in virtual reality and the fact that you are interested in this course does mean you are someone who is an innovator and if you take this course or if you complete this course, I’m sure you will get some good takeaways that will give you a better idea of what can be done with virtual reality on the web which is a very new thing that is actively being developed.
We’ve been created courses and teaching people how to code and create games and different types of applications since 2012 with over 200,000 enrollments and something that we’ve learned over the years is that we are, the best way in how we can do our job is to encourage people to pursue their own learning style. So we don’t try to impose a particular learning style in our students. Some people like to watch the entire course, like watch watch a Netflix show, they will watch everything in a couple of days. Some other people will watch it little by little. They will download the source code. They will ask questions. Some people will just go through the topics they’re interested in so it’s really up to you how you want to access the material.
You can watch the lessons as many times as you want and what we’ve seen that really helps a lot of people is when they work on their own projects on the side. So they are completing the course and they’re also creating something and of course, we recommend people to plan ahead when they will be watching the course so some people allocate a couple of days a week where they spend say an hour watching a couple of lessons and playing with the source code so there are different ways on how to get the most out of this course and we want all of you to succeed so see what’s best for you and use this course in whichever way you find suitable for your own learning style.
Alright well thanks for watching this introduction. Now let’s get started and let’s go and have a look at the A-Frame Library.
Transcript Part 2
In this lesson we’ll continue exploring A-Frame and you’ll keep on learning core foundations so that you can build any sort of project with this library. But before we move any further, I wanted to show you a couple websites here that I didn’t mention before. So in here on the home page if you go to Community, you’ll get access to a few pages here that are very important.
So, there is the Documentation which we’ll be using in this particular lesson. And there are two sites here that are important to check out as well. So one of them is the GitHub repository that is in case you are interested in following the library even on a day to day basis because there are updates here daily in terms of the code. And you can always join a site collaborator as well. If that’s something you want to do. And then there is also the Slack channel which is a great way to get real time interaction with developers that are working with this library.
So if you go here, Slack, it is a, basically an online chatting tool that is free to join and then you can talk to other people in real time that are using this library. So that is their basic support network basically. They also have social accounts and a mailing list if you want to learn more about that.
Alright, so let’s continue exploring what can be done here. So I’m going to go back to my project. And what I’ve done here is put what we did before in a folder named 01. So that’s what we did before. And I created a new folder, 02, and I have that same file in there. I’ve also loaded second file on my local web browser. And so for that I simply change the folder here that we were at, that we are at. And I’ve opened that in my code editor as well.
So, what I want to talk about here are two other transforms that we can apply to a model here or a mesh. So I’m using a lot of words here, right? So let’s start from the beginning. When I talk about position, what we are really doing is applying a translation transformation. So we are transforming a box by moving its position to this place because by default the position is zero, zero, zero. So we are applying what’s called a transform and this is a concept commonly used in 3D modeling, 3D tools. Now when I talk about a model or a mesh, I’m talking about a 3D objects that are represented by vertices.
Let’s bring up the drawing application here. So a, a mesh or a model is, let’s write it down, is represented by vertices or points in space and then each, these are vertices. They all have coordinates, X, Y, Z, and then the vertices are joined by what’s called edges, so that’s an edge. And these terms are common to all 3D applications. So you can have something like that. And once you have three or more edges that are joined together, you can have what’s called a face, which is basically that.
So, in 3D modeling you can have what’s called transforms and that can be a position transform transformation. But you can also have a rotation. And scaling, scale. Whoops, scale. Let’s improve this a little bit. So let’s talk about rotation. Well, you can have rotation about all three axes. So you can have a rotation about X, about Y, about Z. So those are three different numbers. By default, all these models you create have a rotation of zero. Now when is a rotation positive and when is a rotation negative?
Since we are on a right hand coordinate system, a positive rotation is when you use your thumb to point at the positive direction of your axis, so that could be Z, or it could be X, or it could be Y, and then you use your other fingers to close that rotation to make that movement so that will define a positive rotation. And that is specified in angles that go from zero to 360 to do a full circle. So that is the rotation transform. And I’ll talk about scale in a minute, let’s first do something with rotation here.
So let’s rotate our box about the y-axis, so that is, we are going to literally rotate it in this way so that y-axis points up, so we are going to be rotating about the axis that points up. So we going type here, rotation, and then we have to enter the values for X, Y, and Z. So for X, we’re going to leave that at zero. For Y, we’re going to rotate this about, we’re going to rotate this 45 degrees. And no rotation on Z. So I’m going to save that and I’m going to go back here and I’m going to press F5 to refresh page, or press refresh here, reload the page, and we should see that rotation taking place.
So, let’s try a different value here, like 90, for example. And we can see how it’s rotating about the y-axis. And if we set this back to zero, we should have the initial figure. And when we enter 90, it looks the same as now because it’s basically a cube that looks the same in all directions, so they will look the same from all different sides. Okay so, that is rotation and you can of course combine rotations on different, on all the different axes. So you can have a rotation that is something like so. And then you will see that it is rotated about all three axes in different angles.
Now, what about the other transform that I mentioned, scaling? So let’s take a look at that. We can also scale a model, for example a cube, in this case. We can scale it on all different axes as well. And what that means, is that you are basically multiplying the size by a certain number.
So by default, the scale is one, which means that whatever size this has we’re not changing that size. So if you set a scale, for example, a scale on, in this case on X, if you set a scale of two, and this is the X, this is the X-axis, then our cube will be, will be twice the size on that particular axis. So the new cube will look like so. The new end’s no longer going to be a cube, it’s going to be a box. So you can increase the size by changing the scale. And you can also decrease the size by entering a value that is less than one.
So if you say, for example, 0.5, that will reduce the size by half on whichever axis you specify. So let’s go and do that to our box. So let’s, we’re going to keep that rotation there just to, to leave it, so you can play with that value. But I can go here and change the scale. So let’s say that I don’t, actually let’s set the scale and the rotation just to zero so that we don’t get distracted by that. So let’s say that I want my cube to be twice the size in X and I want to be the same size on Y, so it’s the same height. And it’s going to be half the size on Z. And we can actually go here and have a second cube so that we can compare both cubes.
So we’ll position this, let’s position this on two here or on three so there’s more separation between them. They have a, a width of 1 in all directions by default by the way. So this one is not going to have the scale modify so that’s it’s easy to compare both of them. So let’s go back here and refresh this page. And you can see that this one is the one we’ve modified. So on X, which is this axis, it is twice the size. And it is the same height as the other one, but the depth has been reduced by half.
So those are the three basic transforms that you can have. And now something else that I want to specify to talk about is that you can have elements of our children of other elements in here. For example, you can have an element that is positioned on, let’s say a certain point, and then inside of that element, you can have other elements, other objects, other cubes, or anything else. And then if you change the coordinate of the parent object, it will move all the children object as well. And if you scale the parent object, it will also scale all the children objects.
So let’s see how we can do that. So for that, I’m going to add another element here. And I’m going to make this an empty element, if you will. An element that doesn’t really have a geometry of a cube or a sphere or anything like that. So that is going to be called an entity. That is like a neutral type of element. Which you can then transform it. You can then make a cube or make a sphere. So an entity will be, in this case, a containing object. So let’s go and add a containing object and let’s position it somewhere. Let’s position it on X, let’s do minus two here, position it on zero, and minus the, minus one, so it’s a little bit closer to us.
So if we go and open this, we’re not going to see anything because there’s no geometry there. So we don’t see anything new in our scene. So we want to put things inside of this. So if we go and we add a box, the position of that box, whichever number we enter here, is taking the position of the parent as the origin. So if we say zero, zero, zero, the position of the box is not going to be zero in the world in scene coordinates, it’s going to be zero on the parent’s. It’s going to be in this position. So let’s go and do that.
Let’s give this a color. And by the way for color picking, I’ve installed here a color picking plugin for Atom. So go to File, if you are using Atom. I’ve done this by going to File, Settings, and then here Install, and I just searched for color picker. And I found one here and I clicked Install. I think it’s not going to show now. Oh yeah, there it is. I’ve already installed it so it will show here. And you can click Install, and then you have the buttons you need to press on a Mac or a PC to open it.
So on a PC use Control, Alt, C, it gives me a color picker. So I’m going to go and pick a color. Let’s pick this blue. So I’m going to click here. And actually I want the hexadecimal value, so I’m going to go here again, pick some other blue. And, actually I want to pick like a dark green. And click here, Hex, so I’m going to click here and that gives me the hex color. And I’m going to close my a-box element. So let’s go and see what we get in the browser. Press refresh the page.
So we’ve got our box there, that is our box. And we can go and add something else. Or let’s move this up a little bit, let’s move this to two. And I’m going to add another box. And this box will go underneath that previous box, it will go on one. And for this I’m going to pick a certain brown color. So let’s find some color here that we want to use and save this and press refresh. So we’ve got both of them there. And, I will show you now is if I go and I scaled the parent, that one.
So I go to the parent object and I give it a scale of 0.5, 0.5, 0.5, we are applying that transform to all the children. So now it looks much smaller. And the children can also have their own transforms. And those will be applied on top of which everything you applied before. So we can say that the parent object there, that this was something like the top of the foliage of a tree and this is a trunk of a tree. So this could be a scale of 0.2. And we could keep the same height, 0.2 here. And all of a sudden, we can have a simple low poly tree in a very easy way. And then you basically created a tree in this matter so then you can create more trees and you can place them in other parts of your scenes.
We can place trees everywhere that we want, really. And we have something like that. Now, where exactly, why exactly sticking a position here? The position is the center of the mesh, of the cube. So the position here is the center of the cube. And so if you give your cube a certain coordinate, if that is the position you are giving the cube, that will be the center of the cube. And that will be the position, basically, if you have the inside of the cube, something like that. This, the point that you put in the middle, is in the middle. Let’s do this again. So the position of the center of this cube, will be in the middle on all the coordinates. So it will be half of the, it will be X. This will be position X. This will be the position Z. And this will be the position Y.
So the point I guess will be somewhere inside there. So if we bring this down, did something like that, and this is like sort of half of the height. So in the case of the tree, they both by default have a size of one. So we positioned one in Y equals two, and we positioned the other one in Y equals one. So that is why they are like that. And so if we reduce the Y on a scale of 0.5, the new cube will be more in the, still the center of the cube will still be in the middle. The center of the box, I mean, because we want the cube.
So let me go and do that just to show you. Here’s our tree. If I go and I reduce the size of the Y here, we will have that floating in there. So as you can see, there is a difference between both of them. And so if we wanted to do that, then we would also have to adjust the position in Y. But I will leave this as one. Basically the takeaway here is that the point that you specify for position is the center of the box. And that the point is not going to change if you scale the box up or down.
So if you scale your box, you need to adjust the position if you want the center of the box to be at a different place. Well, that is all for this lesson. In the next lesson, we will be introducing more primitive shapes. So we’ll be looking at spheres, at cones, at cylinders, and we’ll be looking at more things that this amazing framework has to offer.
Transcript Part 3
In this lesson, we will add a 360 photo to our scene, so we’ll be using that instead of plain color. And we are also going to learn how to create a reticle, which is like a mouse cursor in virtual reality. It’s like a pointer. And how to do some very, very simple things when we click on some object or when we look at some object in our scene.
So let’s get started and let’s start by talking about 360 photos. So when I first heard about 360 degree photos a while back, I didn’t know how they were stored, like I thought there was a different file format for those photos. But, so how can we store something that is a sphere as a normal image? But if you think about it, we are all familiar with the world map, of course. And the world map is a rectangular representation of something that is a sphere, or approximately a sphere. So the way to bring a sphere into a rectangle, one way of doing it is what is called the equirectangular projection. And for us to use 360 photos in a frame, we need a 360 photo that has a equirectangular projection.
And it turns out that most photos you can take with a 360 cameras have that option. So I’ve taken a photo with my, in this case with the Samsung camera app. And this photo that I took just near my house. And it has the same projection that the world map has. And basically the ratio between the width and the height is two. So if the width is two, then the height is one. So this is the image that we will be using here. Okay, so we’ve got the image already and that is present in my folder, in my images folder.
So what I will do now is import that image into my project. So I’ve created a new project here, this is folder number five. And I already set up the basic scene and I opened up the assets tag so that we don’t have to tag that again. So I’m going to go and I’m going to load my 360 photo, so the name of that file was a little bit long, so I’m going to copy the name of the file and just paste it here. So we’re going to give this an ID of 360 photo, like so. And close this tag. So in our scene, we will be using the same elements that we used to create the plain color sky but instead of using a color, we’re going to use a source and we’re going to set the ID of our photo, so that’s 360 photo. And we need to make sure that we close that tag. So that should be enough.
Let’s go and see if that works. Let’s go to the browser here and we need to make sure to load this (mumbles) five. Yep, it’s all good, so I’m going to press enter. And here we go. So we got the 360 photo in, I don’t know, two lines of code or not even that, so this is an extremely simple way to bring in a 360 photo. It’s almost too simple to be true. So we got the photo now. And there are some imperfections in this photo. It’s not a professionally taken photo but it will do the job for us. So that is how we can bring in a photo.
So now that we have this 360 photos, we’ll do the other part of this lesson, which I mentioned before, which is adding this reticle. So if we go to the inspector, you will see that the ID photo have this camera object. We never really created a camera, we never really gave this camera a position or a rotation. And we can even see the position that has the height of 1.6, which is the number I mentioned when we said that the layer by default was at 1.6.
You cast a certain rotation now because I have been moving around, I have been looking around. But this here has an camera component, so that is something that we should be interested in. It also has a looks control, and that is what allows us to drag that around. And then there’s also this other component that is so that you can move in the scene using the arrow keys in your keyboard. So that is added by default as well.
Although in my opinion, in virtual reality experience is that it’s not as helpful because it’s more like for the computer. But if you are, say, on your headset you’re not going to have those keys. I find that this could be more useful for when you are developing, if you want to be able to move around. Or maybe if you are building a VR experience. That is just something that you can have as well. But in a 360 photo environment, because you can’t really move, the photo is just taken in one position, this would definitely not have any use.
But what I wanted to show you is that there is a camera by default when you don’t add a camera. But when you add a camera, you can have more control as to what will happen in your scene. So let’s go and do that. Let’s go and add our own camera.
So in our scene this time, we will be adding an entity. And this entity will have this camera attribute as camera component, so we’re going to give it the camera component. And it’s also going to have this look controls component, which is the one we used to drag with the mouse to look around. So if we just add that, we should end up with pretty much the same that we had before because there’s no really any change. These things are added by default. So let’s go back to our project here. Let’s reload this page. So we have what we had before, but now we have been explicit about it.
So what else I can do here, I can, and in fact if we go here, and select the camera now, you’ll see that the position is now zero because we didn’t set the position. And since we are setting the camera, now we are in control of the position of the camera. And also we no longer have that added element.
So we just have the very basics, the very default values. I will give that height to my camera, so position equals zero and 1.6 and zero, just so that we can have elements that are say, underneath of us, or above us. But since we are on a 360 photo, it doesn’t matter because the photo is always the same. So that is for the camera. Now why is it that we added the camera? It is so that we can add things inside of the camera. And whatever you are inside the camera follows the camera around because it’s a child object. And what we want to have here is a cursor. So it’s a cursor. And that is what is for the reticle.
So if you just add a cursor and slash a cursor, that will give us a reticle and that is what we can use to select things. So you can see that ring there. So you can change the color of your reticle, so we can say color equals cyan, like a more shiny color. And we’ve got something that looks better now. It kind of looks like the loading indicator on Windows Vista or something. But anyway, feel free to change it. You can also learn more about the cursor in the documentation here. So if we go scroll down, we’ll find the a cursor element.
And there aren’t that many options, really, but you’ve got some more stuff in there. Like the maximum distance, how far elements can be before they, when they interact with cursors. If something is too far away, the cursor won’t be able to interact with it. Now that we have the cursor, we can start using some events. So what I want to show you here in the documentation as well, if we go to events, that is somewhere in here, I think I’m gonna have to find it, like so. It’s not that part. There is one part that has the events of the, oh no no, sorry, it’s my bad. It is in cursor. And then if you go to events here, so here we have different events that we can have with our cursor.
So we can have, for example, when the cursor interacts with the entity, or when the cursor no, intersects with the entity, or when no longer intersects with an entity, and the ones that are related to the mouse, if that is when you are pressing on an entity, or when you stop pressing on an entity, and the click is a click, basically. But the click will also work on, for example, the Google cardboard or some other headsets that have a clicker button or a single button that’s like a trigger button that can be used for that event.
Let’s now implement something interactive, something simple with our reticle. What we’ll do is be able to make a box disappear when we click on it. We’ll be using an animation for that. And then in the next lesson we’ll look at animations in a more depth and we’ll cover more properties of animations. But for now we’ll just implement the very basic, the most basic animation that we can think of. So I’m going to start by creating a box, which I will make of color red, and I will give this box a certain position, let’s say two minus four and one. This will be a box that we should be able to get in our scene.
So let’s go back to our project here. Where is this box? I’m not seeing it anywhere, let’s see if I made some mistake here. So we’ve got the color red, position. Oh, so this should be one, this should be minus four. I keep on getting those confused. Okay, so now we should see this box right from the start.
All right, so now we want to be able to click on the box and have the box disappear. So inside of the box component we’ll be adding an A dash animation element. And this will allow us to change a certain property of the box. So the property will be changed and this will be specified under attribute. So the property is called visible. That is what you use to make things appear or disappear. So you can add the visible property, for example if you add visible equals false to our sky, our sky should no longer be there.
So that is something that you can use for any element. So this could be a position, it could be scale, it could be color, but we’re going to use visible. So now then, we need to specify what is going to be the end value at the end of the animation. So it is a property called to. The end value at the end of the animation is going to be false. And now we need to enter what event will make this animation start. So it’s a property called begin. And the property here will be that this will be the name of the event, which is click. So this should give us a very basic behavior, interactive behavior.
So if I go and save that, I should now be able to click on the box and have the box change its visibility property to false. Let’s try that. Let’s go over and refresh the page. And bring our cursor there, and now if I click, my box is disappeared. It’s still there, but it’s just invisible so we can no longer click on it again. It’s basically gone from the scene. All right, so we’ve got that basic thing working and you have learned in this lesson how to load a 360 photo, which on its own is something that can be quite useful.
We have also learned that in order for us to have a cursor, we need to place that inside the camera, and for that we need to take control of our camera and create our own camera. Look controls is what gives us this nice way of looking around with the mouse. And since we created our camera, we now have to basically take ownership of the position of the camera. We can create a reticle in this manner, and then if you want something to react to an event, you can simply create an animation, specify the attribute, and then you can set its value, what you will change it towards, and you can specify which event will trigger this animation.
So that is all for this lesson. I will see you in the next video.
Interested in continuing? Check out the full WebVR for Beginners – Build VR Websites with A-Frame course, which is part of our Phaser Mini-Degree.
